Showing posts with label dogs. Show all posts

Sunday, October 2, 2011

Apple Season

Nate, Lilly, and I went apple picking yesterday and brought home 21 pounds of apples.
It was a gorgeous Fall day- Lilly was loving the crisp weather and cool breeze.
There is something about spending the day in the mountains that really gets me into fall mode!
Now I also am in apple cooking/baking mode! Today I started with apple doughnuts. They only used one apple :) BUT, they also used apple cider (which we also brought home yesterday) and apple sauce.
I used this recipe from Peas and Thank You- I added one apple to the recipe- peeled and diced into very small pieces. I just folded the apple pieces in at the very end.
I also plan on making apple sauce, apple pie (Nate's favorite), carrot apple ginger soup, and any other apple recipe I come across that looks good! If anyone has any suggestions, send them this way!

I'm also working on a blog post for our delicious and hearty "warm me up" type of dinner we had tonight, so stay tuned!

Happy apple season!

Saturday, August 27, 2011

Doughnuts, Puppy Party, & Back to School

This last week has been crazy busy for me. First and foremost, my cute little pup turned five! We celebrated with some puppy cake and doughnuts at our favorite dog-friendly bar in Charlotte, Thomas Street Tavern. Dogs are allowed in their large back patio area. There is plenty of seating, as well as some outdoor games! Think ping pong, corn hole, and a ring and hook game. We mostly stuck to my favorite activity, relaxing with a drink in hand... and a dog on my lap.

I baked blueberry doughnuts, for the people at the party.
I made two batches of blueberry glaze- the darker one just has more blueberry juice in it.
They were yummy, but slightly "healthy" tasting, due to the small amount of sugar in the recipe. The blueberries added a nice juicy burst in each bite.
The remnants of frosting the doughnuts, made a very pretty piece of waxed paper!
Pretty and tasty!
We got Lilly the dog cake at Canine Cafe
She loved it!
So did Lacey!
Sydney ate hers too fast for me to get a picture!
The pups took home pumpkin muttins as their party favors.
Then, before I knew it, we had our first day of school!! 
My new class seems wonderful so far, it will just take me awhile to get back into this routine! A few of my little darlings brought me teacher gifts: a blanket from India, an "I will miss you when I move in four days" card (yes, she's only in my class for 4 days), an apple for the teacher, and a freshly picked cucumber. They are too cute.

My kitchen and I are going through withdrawals, due to my lack of cooking lately. Hopefully I will be able to get back to it again sometime soon!

Saturday, August 20, 2011

The Intermingling of Summer and Fall

I got my first taste of Fall today! Literally. We got Honeycrisp apples at the farmer's market. From what I have observed, these apples are only available in the Fall (In North Carolina anyway). They are appropriately described as "explosively crisp" on the Honeycrsip website I checked out today. While it still feels like summer here and there are still plenty of summer fruits and veggies available, I was pleased to dip into this Fall flavor I love so much!

We got cherries and Honeycrisps at the market today.
A beautiful combination of Summer and Fall flavors.
Simple. Pretty. Colorful.
After tasting this apple, my mind has been in complete Autumn mode the rest of the day. My little sweetheart Lilly turns five tomorrow! I decided to make her "Pumpkin Muttins" as a birthday treat. The entire house smelled of pumpkin goodness.
These muffins are so good- I tried a piece, and people can not only eat, but enjoy these! This recipe is much sweeter than other dog treat recipes I have made, so give them sparingly to your pet!
Pumpkin Muttins
(Print Recipe)
Adapted from Organic Dog Biscuit Cookbook

Ingredients
1 cup oat flour
1 cup brown rice flour
2 teaspoons cinnamon
2 teaspoons baking powder
1/2 teaspoon baking soda
1/2 teaspoon ground cloves
3 flax eggs (3 tablespoons flaxseed meal, mixed with 1/2 cup water plus one tablespoon water)
3/4 cups honey
1/4 cup safflower oil or canola oil
1 15 ounce can pumpkin
pepita seeds for garnish

Directions
Preheat the oven to 350 degrees. Line a mini muffin pan with cupcake liners. Mix the flax egg and set aside. Mix the dry ingredients in a large bowl. Make a well in the dry ingredients. Pour all wet ingredients into the well, including the flax egg (make sure it has thickened up first). Mix the wet ingredients together, then begin mixing in the dry ingredients until everything is well combined. Pour into cupcake liners in the mini muffin pan. Fill all the way to the top- these will not rise much. Stick one pepita seed into the center of each muffin, so it is showing half way. Bake 15-17 minutes, or until a toothpick inserted into the center of the muffin comes out clean. Let cool completely. Store in a sealed container in the fridge or freezer.

This is before I baked them. Notice how much I filled them.
And here they are all ready for pups to enjoy!
Happy birthday Lilly!
Enjoy your pumpkin muttins!
And I'll enjoy the intertwining flavors of Summer and Fall!
And maybe... just maybe, I'll have a pumpkin muttin too... don't judge me. You'd eat one if you knew how good they were :)

Monday, August 15, 2011

Oatmeal Carrot Dog Treats

I feel like I have had a pretty productive day today. With summer coming to an end, I realized all the things I hadn't gotten done yet, that I was so sure I would find time to do during my vacation. The procrastinator in me prevails every time. So today I decided to follow through on some of my goals, before my spare time dwindles into almost nothing.

I baked Lilly some treats! (Recipe to follow)
I organized my closet.
I donated old shoes and clothes! It had been awhile since I had gone through my closet!
I Organized/sorted through my jewelry.
My sister made this earring holder for me a few years ago- I LOVE it!
Can you tell where I take Lilly's bows off at night?

I organized the pantry (well, started to).
I'd call that enough for today. The closet was the biggest task- it was actually a two day process. 

I of course found a little time to browse pinterest and read new posts from my favorite blogs. I also read a heartbreaking article about starving dogs in rural India. I am so glad that The Karma Dog Project is trying to help them and I wish there was more I could do! They obviously need donations to fund this project so if this tugs on your heart strings at all and you are able to donate, they would put it to good use (I'm donating what I can with my very limited funds right now). Every little bit helps!

Lilly loves her vegetables. We often give her leftover veggies mixed in with her dinner and as treats. Can you guess what was mixed in with her breakfast this morning?
Beets :)
I decided to make her some dog treats based on another of her favorite veggies, that won't stain her face blood red. Carrots! She absolutely loves these oatmeal carrot treats and they are healthy for her!
Oatmeal Carrot Dog Treats

Ingredients
1 mashed banana
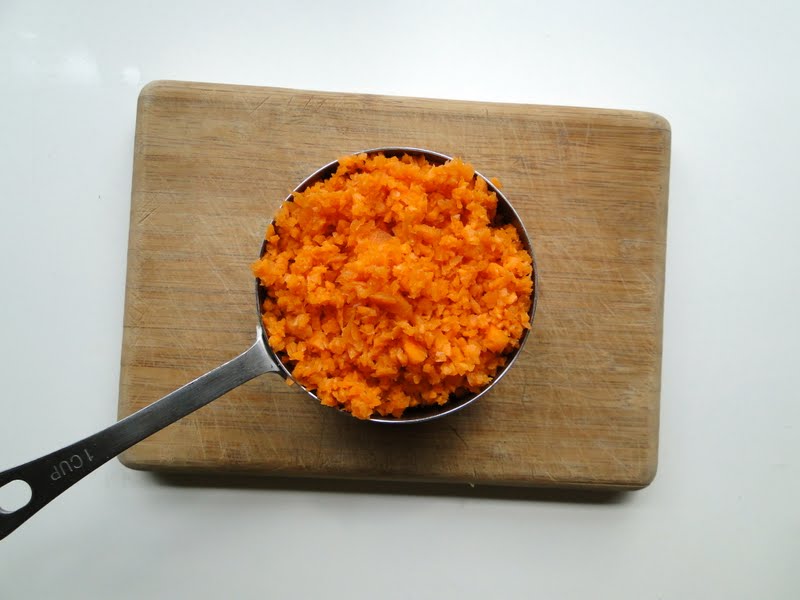
1 cup food processed carrots (until coarsely chopped)
1/4 cup applesauce
1/8 cup water
1 cup oats
1 cup brown rice flour
1 cup oat flour
1/2 teaspoon cinnamon

Directions
Pre heat oven to 350 degrees. Mix all ingredients in a large bowl, until the right consistency to roll out. Add a little extra water if too dry, a little extra flour if too sticky. Roll out dough on a floured surface until 1/4 inch thick. Using a cookie cutter, cut out into pieces and place on a parchment paper lined baking sheet. Bake about 20-25 minutes. Allow to cool before serving. Store in an airtight container in the fridge for about 10 days, or freeze for longer lasting treats!

I processed my carrots until they looked like this.
You can put the treats close together on the cookie sheet- they do not spread or rise while baking.
Your dogs will love these healthy treats!
Lilly found a comfy shady spot in the backyard and watched me take pictures of her treats.
While I was out there, I noticed our tomatoes have dwindled. The ones that are left look like this. I wonder if it is because they need more water? Or they are getting too much sun? Or it is the end of their growing season?
Lilly likes these as treats too! She is a good little veggie eater :) She also highly suggests you make these oatmeal carrot goodies for your dogs and dog friends!
Now I'm headed back to the kitchen (where I belong, as my husband likes to joke. I think he's joking...) to make farmer's market quinoa for dinner. We have tons of farmer's market veggies so this a great way to use them up!

Wednesday, July 20, 2011

Stuffed Peppers

Before today, I was not a stuffed pepper fan. I have not had them in a very long time and I am guessing the ones I had tasted in the past were very substandard. I came across a recipe the other day that had me intrigued, so I decided it was worth a shot! I have to say, I am so glad I decided to try it.
Yummy looking, right? After I took these pictures I decided to add avocado, fresh basil, and a few slices of fresh cherry tomatoes as garnish (I wished I had thought about this before my food photo shoot!) If you make these, I would highly recommend adding all 3 things (especially the avocado and basil) for an extra pop of fresh flavors!
Stuffed Peppers
(Print Recipe)
Adapted from FatFree Vegan

Ingredients
1 medium onion, chopped fine
1 large portabello mushroom, diced
1 jalapeƱo pepper, minced (or more to taste)
1 16-ounce can black beans, drained and rinsed well
1 1/2 cups fresh corn (from 2 corn cobs)
1 15-ounce can can fire-roasted tomatoes
1 medium fresh tomato, diced
1 teaspoon smoked paprika
1 1/2 teaspoon chili powder (or more, to taste)
1 teaspoon salt
1/2 cup dry basmati rice, cooked according to package direction
5 red, orange, or yellow bell peppers
1 avocado, diced
fresh basil and sliced fresh cherry tomatoes for garnish

Instructions
Heat a large non-stick skillet or saucepan. Add the onion and cook, stirring often until it softens, about 4 minutes. (Add a splash of water as necessary to prevent sticking.) Add the mushrooms and jalapeno and continue to cook until mushrooms soften.
Add black beans, corn, tomatoes (canned and fresh), rice, and seasonings. Cook for a few more minutes to allow most of the tomato liquid to cook off.
Preheat oven to 400F.
While the chili is cooking, prepare the peppers by cutting them in half through the stem end, removing the seeds and membranes, and rinsing the insides to make sure all the seeds are out. Check to see if they will stand upright, and if not, peel a strip off of the back side. Oil a baking dish big enough for the peppers (or line it with parchment paper). Fill each pepper half with the chili and place it in the baking dish. Bake until peppers are tender, about 25 minutes.
Sprinkle each pepper with avocado, fresh basil, a few slices of cherry tomatoes and serve hot.
Oh so tasty! If you are not a mushroom fan, I truly think you will still like these- you can't even tell they are in there, but they add some nutrients and bulk to the dish!
I just had to share this photo collage from a dog birthday party we attended last night. Such cute pups! Can you tell which one is the birthday girl? (Hint: She's dressed for the occasion).
It was super hot out, but the dogs had plenty of water to dink and some doggie daiquiris (non alcoholic, of course). Look at these YUMMY doughnuts the birthday girl's mom made (recipe here)- These were treats for people, not dogs.
Who doesn't love a good puppy party, with homemade doughnuts?

Nate and I still have more and more tomatoes ready in our garden every day- I used some of them for the stuffed peppers but still need to use up more! I noticed this today when I went out to the garden... at one point it was a pot of soil. This weed decided to take over, but I think it is kinda pretty.
Even if you don't think you are a stuffed pepper fan, these deserve a chance! They will definitely be going into my menu rotation- especially while all these fresh veggies are in season. I am guessing they could be done on the grill too (medium heat, on foil, cover closed)- which would be a great way to keep your kitchen cool in this summer heat!
Happy cooking!