Showing posts with label recipes. Show all posts

Tuesday, July 3, 2012

Orange Peach Carrot Juice

I'm back with another juice recipe! This one comes in a close second to the beet juice I previously blogged about, and it is my husband's favorite so far. This orange peach carrot juice has a beautiful orange hue to it, almost like an orange creamsicle.
Once again, you start with simple, fresh ingredients, blend them, strain them, and sip all the delicious vitamins and nutrients through a straw.
Orange Peach Carrot Juice
Makes 2 servings (about 4 cups)

Ingredients:
2 peeled oranges
2 peaches, quartered, seeds removed
4-5 medium carrots, halved
Juice from one lemon
1/2 inch ginger
2 cups water

Directions:
Place all ingredients in the Vitamix (or other high-speed blender), blend on full speed 1-2 minutes. Strain through a nut milk bag, into a large bowl. Squeeze to release all excess juices. Serve in a chilled glass and enjoy!
I love having fresh juice for breakfast. I especially love having fresh juice for breakfast when it's already made for me, because the second serving is waiting in a mason jar, from yesterday!

Thursday, June 28, 2012

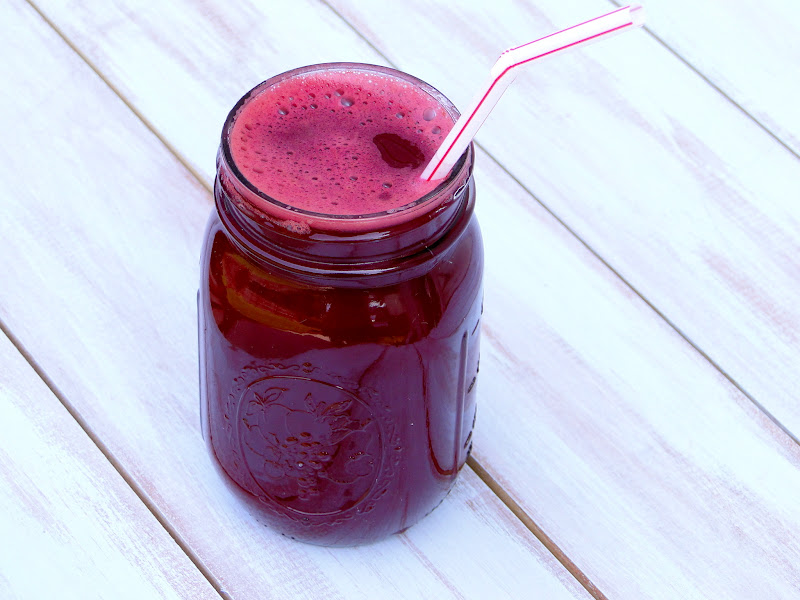
Beet Carrot Apple Juice

Recently I've been making fresh juices, using my Vitamix. I know it's not quite the same as drinking juice from a juicer, but I am making due with what I have, and I have to say it's been pretty tasty! I've made about 5 different concoctions so far, and this Beet Carrot Apple Juice has been by far my favorite.
Basically you start with these simple, fresh ingredients...
Blend them in the Vitamix, strain them through a nut milk bag, and your juice is ready! Here is the process in a nutshell.
Since I am using a Vitamix, not a juicer, I need to add some water too, which is fine, because that equals more juice for me to drink (and it doesn't taste too watered down to me at all)! This recipe makes two servings, so I save one for later, in a canning jar in the fridge.
I like to drink the freshly made one in a chilled glass with a few ice cubes- I prefer my juice ice-cold! This process definitely takes some time, and has a good amount of clean-up involved, but it helps that it makes TWO servings, not just one.

I had a little helper who came out back to watch me shoot photos... but she soon found a "comfy" bed to lay on and heat up in (aka, our grill cover that had blown off). I don't know how she could stand it- it was already at least 80 degrees outside.
Beet Carrot Apple Juice
Makes 2 servings (about 4 cups)

Ingredients:
2 beets, peeled and quartered
2 apples, quartered and cored
4 carrots, halved
Juice from one lemon
1/2 inch of ginger (or more, if you prefer)
2 cups water

Directions:
Place all ingredients in the Vitamix, blend on full speed 1-2 minutes. Strain through a nut milk bag, into a large bowl. Squeeze to release all excess juices. Serve in a chilled glass and enjoy!

Note: If you do not have a high-powered blender, like a Vitamix, I am not sure how well these ingredients would blend up, to make a juice. Please let me know if you try!
I plan on making lots more fresh juices throughout the summer- and will hopefully be back to share a few more favorite combinations!

Saturday, February 25, 2012

Green Spiced Smoothie

Since the beginning of the new year I have been into making green smoothies for breakfast. It's the perfect breakfast option for me because it is packed full of nutrients and I can take it to-go! This is my newest creation that I am actually currently enjoying as I type this.
If you don't have a high powered blender (I was lucky enough to get a Vitamix recently and LOVE it), I would suggest replacing the kale with spinach. The kale is much more fibrous and harder to break down- which may result in the kale not completely blending in your smoothie. Or maybe that doesn't bother you- in that case, go for it!

Green Spiced Smoothie
Serves 2
(Print Recipe)

Ingredients
2 cups kale, stems removed (if you use spinach, no need to remove stems)
1 cup almond milk
3/4 cup filtered water, or additional almond milk if you prefer
2 sliced and frozen bananas
1 thin slice fresh ginger (I throw it in the blender un-peeled. You could also grate it first, enough to equal about 1/2 teaspoon, or more if you like it with a kick!)
1/2 teaspoon vanilla
1/4 teaspoon cinnamon
2 pinches each of ground cardamom, cloves, and nutmeg
dash freshly ground pepper
6 ice cubes

Put everything in the blender and blend until smooth.
It's just like a chai flavored smoothie, but green! Try it, and adjust the spices to your taste.

Here are a few bird pictures my husband recently took of birds in our backyard. At any given time, if we look outside, there are birds on our fence, feeder, tree, and grass. All just hanging out or eating.
Three birds crammed onto one feeder.
Even a woodpecker!
We haven't had any snow yet this year. I always love the contrast of the birds against freshly fallen snow. Oh well, spring is on it's way, and I'm not complaining!

Monday, December 19, 2011

Chocolate and Peppermint

I decided to go with a chocolate and peppermint theme for my homemade christmas gifts this year. That flavor combination always tastes best to me at Christmas time. In fact, the rest of the year, I think I forget about it. I used these little jars to put all my baked goods in, and made them look festive with some ribbons, red paper, and candy canes.
The bottom layer of the jar consists of balsamic fudge drop cookies (recipe found here). I used 1/2 teaspoon peppermint extract in place of the vanilla, and I used crushed candy canes in place of the vanilla sugar. I love these cookies and have made them every Christmas, ever since I discovered the recipe a few years ago.
I made a double batch of these... TWICE. The picture below shows one batch of a double recipe. Got milk? (The almond variety, of course.)
The next layer consists of both peppermint fudge and coconut fudge (recipe found here). This recipe couldn't be any easier! It was by far the simplest thing I made- and just as delicious, chocolatey, and pepperminty, as everything else! (The coconut fudge is not pictured, because I decided to make it at the end of my baking marathon/photo shoot, since the peppermint one was so easy to make!)
The top layer in my gift jars is my absolute favorite- peppermint bark! I make this every year, but this year was different because I decided to make the white chocolate myself (recipe found here), so it would be dairy free! The hardest part of this was finding the ingredients. I had to go to several health food stores in order to find food grade cocoa butter and powdered soy milk. Actually making the white chocolate was the easy part, once I finally had all the ingredients. Note: you must QUADRUPLE this recipe for white chocolate, in order to have enough for the peppermint bark recipe below.
Once I made the white chocolate, I followed this recipe to make the peppermint bark (there is no need to harden the white chocolate in molds and then remelt it for the peppermint bark- just use the freshly made, warm/liquid white chocolate).

Peppermint Bark
(Print Recipe)

Ingredients:
12 ounces chocolate chips
1 pound white chocolate (If you use store-bought, make sure it is the kind made with real cocoa butter- it makes such a difference!)
1/2 teaspoon peppermint extract
1/2 cup candy canes (or more), crushed

Directions:
Preheat oven to 250 degrees. Line a 9x13 inch pan with foil, letting it hang over the sides. Spray foil with oil. Pour the chocolate chips in an even layer on the foil. Place in oven for 5 minutes. Remove from oven, smooth with spatula or knife. Place in refrigerator until cold and firm (about 20 minutes).

Melt white chocolate in a double boiler (or follow and quadruple the recipe above, to make your own white chocolate). Stir in the peppermint extract. Pour the melted white chocolate over the chilled chocolate layer and spread it quickly and evenly. Sprinkle with crushed candy canes.

Chill until both layers are firm. Lift foil out of pan and shake off excess candy. Trim edges. Cut into 2 inch wide strips. Peel bark from foil and cut each strip as desired. Chill in a covered container.
To my family who will be receiving these goodies in the mail: First of all, SURPRISE, this is your gift from me. Second of all, don't be too disappointed when they don't arrive in this pretty package- I don't think they'd make it through the mail that way- think more along the lines of tupperware, with all the same treats inside.
Happy baking!

Friday, November 25, 2011

Thanksgiving Recipes

Yesterday was a day of risks for me. Every recipe I made was a brand new recipe. Every. Single. One. I got most of my recipes from blogs that have been tried and true, so I knew they were reliable. However, there is always a certain risk you take, when making a recipe for the first time. Little kinks that may need to be worked out. When we sat down to eat, I loved every single thing! Enough to want to document it on here, not only to share with you, but for me to refer to next Thanksgiving (and maybe this Christmas, for a couple of the dishes). There were a few "hiccups" along the way, but nothing major... all easy fixes.

I'll start with breakfast. Pumpkin cinnamon rolls.
Need I say more? This might have been my favorite thing all day.

I made Lilly a mini one (with no frosting... and no cinnamon crumble in the middle... shhhh, don't tell her).
This Pumpkin Cinnamon Roll recipe can be found here. Thank you Peas and Thank you, for another amazing recipe! I made one minor adjustment. From the 1/4 cup of sugar, take out four teaspoons and add it to the warm milk (100 degrees to be exact, if you have a thermometer). This will help activate the yeast. My first try didn't activate, so I tried this and it worked much better.
Here is the process in a nutshell.
Make these for ANY occasion. You won't be disappointed!

I also made a delicious Rustic Herb and Veggie Stuffing! I didn't exactly follow a recipe for this, so I did my best to write down everything I did, so I can replicate it again. I loved all the veggies in this stuffing!
Rustic Herb and Veggie Stuffing
(Print Recipe)

Ingredients
1 medium sweet potato, cubed
1/2 medium butternut squash, cubed
8 cups bread, cubed and lightly toasted in a 350 degree oven (I used a round loaf of rosemary and olive oil bread, and some french bread)
10 ounces mushrooms, chopped
2 cups leeks, chopped
2 cups celery, chopped
1 cup carrots, chopped
3 cloves garlic, minced
2 tablespoons sage, plus more for roasting veggies
2 tablespoons rosemary, plus more for roasting veggies
2 tablespoons thyme, plus more for roasting veggies
2 cups vegetable broth
2 teaspoons salt (or to taste)
1 teaspoon pepper (or to taste)

Directions
Preheat the oven to 350. Put the cubed butternut squash and sweet potato on a sheet pan, sprayed with oil. Spray the tops of the squash and sweet potato with a little oil. Sprinkle with a little salt, pepper, sage, rosemary, and thyme. Roast for about 25 minutes, or until tender, stirring occasionally.

Meanwhile, prepare the rest of the veggies. Spray a large skillet with oil. Add the mushrooms, leeks, celery, carrots, garlic, sage, rosemary, thyme, salt, and pepper. Saute until all veggies are tender- about 6-8 minutes. If needed, add a few splashes or vegetable broth. Once the veggies are tender, add 2 cups of vegetable broth.

In a large bowl, combine the bread, roasted veggies, and sauteed veggies. Mix well. Transfer to an oiled baking dish, bake at 350 for about 35-40 minutes, or until golden and heated through.
The perfect ratio of bread/veggies. Again, you won't be disappointed!

Another Peas and Thank You recipe- Roasted Garlic and Herbed Smashed Potatoes. The roasted garlic flavor adds a nice touch!
I made "The Best Vegan Green Bean Casserole" From FatFree Vegan. I have never had a vegan green bean casserole, so I don't know if it is the best- but it was pretty darn good! Very fresh and light tasting! I would make a minor adjustment next time though- mix some of the fried onions through out the dish, and put the bread mixture on top, BUT don't add the fried onion topping until near the end of the baking time. Some of the pieces came out too dark and crispy. It wasn't a big deal, I just picked them off, but for future reference.
Nate is not a Fan of fried onions- so I only put them on half of the casserole. This dish made his favorites list!
My next recipe came from Oh She Glows- "This Ain't Grandma's Sweet Potato Casserole". This casserole is a sweet dish, not savory. I really liked it, but it is very rich, so I could only eat a small amount of it. I'd definitely make it again though.
I left pecans off half of it.... because someone doesn't like pecans (I won't name any names... this time).
I however, love pecans.
Our meal also included the pear and pomegranate cranberry sauce that I blogged about recently.
Here it all is!
And, last, but not least, dessert. This dessert was super rich and creamy- Brownie Pumpkin Pie With Crunchy Pecan Topping.
YUM! This would be great at Christmas time too!
Needless to say, we didn't go hungry this Thanksgiving!

Wednesday, November 23, 2011

Cranberry Sauce with Pears & Pomegranates

This was my first attempt at making homemade cranberry sauce and I have to say it turned out well! I only tasted a few bites because I have to save it for tomorrow. I love how pretty the berries looked, covered in sugar!
My absolute favorite breakfast in the winter, is pomegranates and oranges! (Photo from my Iphone, on Instagram.)
This recipe combined both of these ingredients, along with the cranberries, so I couldn't pass it up!
The sweetness of the pears adds a nice aspect to the sauce too!

Cranberry Sauce with Pears and Pomegranates
Adapted from Family Fresh Cooking

Ingredients
12 ounces fresh or frozen Cranberries
1 Pear-cleaned, cored & diced, skin left on
juice from 1 Orange (about 1/4 cup)
1/4 cup water
1/2 teaspoon of ground Cinnamon
pinch of ground Ginger
Pinch of Nutmeg
3/4 cups sugar (more or less to taste)
2 ounces Pomegranate Seeds plus extra for garnish
Orange Zest

Directions

Rinse fresh cranberries. Place cranberries, orange juice, pear, water and spices in a medium saucepan. Heat on stove top over medium heat until boiling. Reduce heat to a simmer, partially cover with a lid and cook for about 10 minutes. The cranberries will burst and the sauce will thicken a bit. Add more water or orange juice if you want a thinner sauce. Stir occasionally so your sauce does not burn. Add sweetener to taste and adjust spices if needed.

Add pomegranate seeds at the end and gently stir them into the sauce. As this sauce cools it will continue to thicken a bit. Serve topped with fresh pomegranate seeds and grated orange zest.
I realize this recipe is a little late for Thanksgiving... but maybe keep it in mind for Christmas!

Since I haven't blogged in awhile, I thought I'd share a few pictures from the last month. Fall is my absolute favorite time of year! We took a day trip to the mountains (as we do every October) and I snapped a picture of my favorite tree in Blowing Rock!
And what would a trip to the mountains be, without a cute little dog tagging along?
Pretty Berries!
And another photo courtesy of my Iphone and Instagram (my newest obsession... my poor camera has been slightly neglected). This was taken on my way to work!
We went for a few walks at the lake near us.
Not too long ago, the woods behind our house looked like this.
Now, not so much.
That's the only bad thing about Fall... it never lasts long enough. I guess that's part of the novelty of it all!

Happy Thanksgiving Everyone!