Monday, August 15, 2011

Oatmeal Carrot Dog Treats

I feel like I have had a pretty productive day today. With summer coming to an end, I realized all the things I hadn't gotten done yet, that I was so sure I would find time to do during my vacation. The procrastinator in me prevails every time. So today I decided to follow through on some of my goals, before my spare time dwindles into almost nothing.

I baked Lilly some treats! (Recipe to follow)
I organized my closet.
I donated old shoes and clothes! It had been awhile since I had gone through my closet!
I Organized/sorted through my jewelry.
My sister made this earring holder for me a few years ago- I LOVE it!
Can you tell where I take Lilly's bows off at night?

I organized the pantry (well, started to).
I'd call that enough for today. The closet was the biggest task- it was actually a two day process. 

I of course found a little time to browse pinterest and read new posts from my favorite blogs. I also read a heartbreaking article about starving dogs in rural India. I am so glad that The Karma Dog Project is trying to help them and I wish there was more I could do! They obviously need donations to fund this project so if this tugs on your heart strings at all and you are able to donate, they would put it to good use (I'm donating what I can with my very limited funds right now). Every little bit helps!

Lilly loves her vegetables. We often give her leftover veggies mixed in with her dinner and as treats. Can you guess what was mixed in with her breakfast this morning?
Beets :)
I decided to make her some dog treats based on another of her favorite veggies, that won't stain her face blood red. Carrots! She absolutely loves these oatmeal carrot treats and they are healthy for her!
Oatmeal Carrot Dog Treats

Ingredients
1 mashed banana
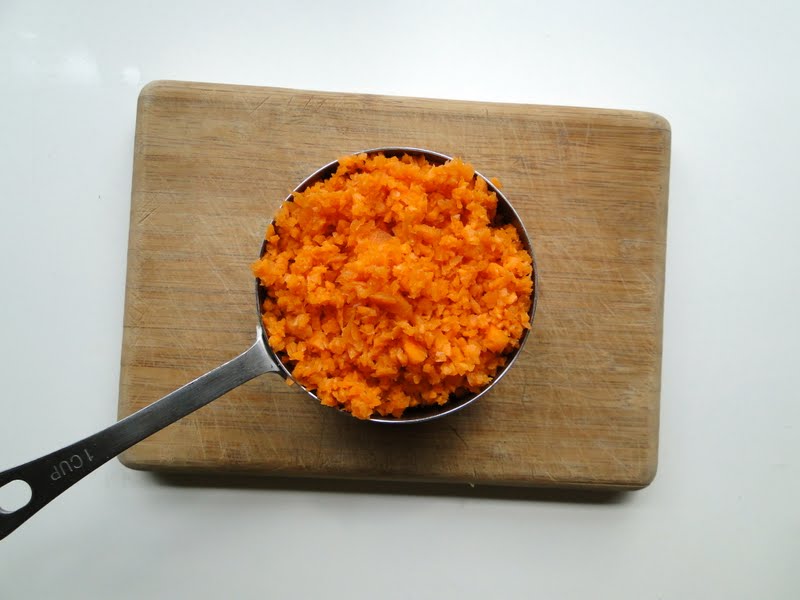
1 cup food processed carrots (until coarsely chopped)
1/4 cup applesauce
1/8 cup water
1 cup oats
1 cup brown rice flour
1 cup oat flour
1/2 teaspoon cinnamon

Directions
Pre heat oven to 350 degrees. Mix all ingredients in a large bowl, until the right consistency to roll out. Add a little extra water if too dry, a little extra flour if too sticky. Roll out dough on a floured surface until 1/4 inch thick. Using a cookie cutter, cut out into pieces and place on a parchment paper lined baking sheet. Bake about 20-25 minutes. Allow to cool before serving. Store in an airtight container in the fridge for about 10 days, or freeze for longer lasting treats!

I processed my carrots until they looked like this.
You can put the treats close together on the cookie sheet- they do not spread or rise while baking.
Your dogs will love these healthy treats!
Lilly found a comfy shady spot in the backyard and watched me take pictures of her treats.
While I was out there, I noticed our tomatoes have dwindled. The ones that are left look like this. I wonder if it is because they need more water? Or they are getting too much sun? Or it is the end of their growing season?
Lilly likes these as treats too! She is a good little veggie eater :) She also highly suggests you make these oatmeal carrot goodies for your dogs and dog friends!
Now I'm headed back to the kitchen (where I belong, as my husband likes to joke. I think he's joking...) to make farmer's market quinoa for dinner. We have tons of farmer's market veggies so this a great way to use them up!

Friday, August 12, 2011

Fall Wish List

With the start of school just around the corner and the fall collections all displayed in the stores, I can't help but start to crave that cool crisp fall weather again. The change of seasons always tends to spur me into shopping spree mode. Most of my shopping has been limited to window shopping so far... but I'm going to have to break down eventually and buy something on my list of things I love and want.

This pretty much sums up what I am looking forward to...
Credit: Tiny White Daisies
Along with some of the items on my fall wish list.
Chan Luu wrap bracelet

Frye harness boots
French Press
I want make french press coffee and cozy up in a warm sweater... and recreate this photo! Doesn't this just scream Fall?
Photo from We Heart It
Handmade Mug
Knit fingerless gloves
Cozy comfy hoodie
Is anyone else looking forward to a slight chill in the air?
Penelope Illustration
I'm also looking forward to new options in the recipe world! Root veggies, soups, breads, and everything pumpkin will surely be making an appearance here!
Source
Now the wait begins for some cooler weather in North Carolina, which won't make a showing until late October. Stay tuned for more summer recipes until then!

Wednesday, August 10, 2011

Random

Summer is coming to an end for me.
I wish it wasn't so!

This week hasn't exactly been successful as far as recipe sharing goes. Earlier in the week I made a red bean and barley bowl that was definitely blog-worthy. The only problem... I skipped breakfast (tsk, tsk) and made lunch late, so by the time my lunch was ready to eat, I was ready to eat too- not ready to spend time taking pictures of the mouth-watering lunch I had made on a very empty stomach. Don't worry though, I do plan on making this again, and hopefully will find it in me to take 10 extra minutes to snap some pictures.

I also made some doughnuts that I first tried at Lacey's puppy party. They were so delicious and I was really looking forward to using my new doughnut pan as well as eating these sugary little treats. There was a slight problem though. You see, my baking soda and baking powder both come in red canisters. The recipe called for 1 and 1/2 teaspoons of baking powder. I bet you can guess what I used instead, because I wasn't paying attention. Lets say they looked much better than they tasted. The metallic after-taste made this recipe a fail. BUT they are a total success if you follow the recipe (found here) correctly.
Tonight, I was excited to try a new recipe, wild rice salad with oranges and roasted beets. From start to finish, this took me about two hours to make. Now, not all of that time was prep-time, but I had to wait an hour for the beets and rice to cook and I had to wait for them to cool before putting the salad together. Basically, I made a big, beet stained mess and all I have is a sub-par recipe to show for it. I ate it, so it wasn't horrible, but it is definitely not blog-worthy, and I will definitely not be making it again. Oh so disappointing, to spend that much time on something that turns out not as expected. It comes with the territory of trying lots of new recipes though!

Remember the green-horned caterpillar we found on our tomato plants? Well, look what Nate found today! EWWWWWWWW!
I think those are it's eggs? The first one we found didn't gross me out like this one did!
Actually, it's probably a good thing I am not sharing a new recipe on here today, because this would probably ruin your appetite. Surprisingly, none of our tomatoes have been eaten, and our tomato plants seem to be fine too. But apparently green-horned caterpillars come with the territory of tomato growing.
I'll end on a little success I actually had. Remember the moon pictures that Nate and I took? I was finally able to get some detail on a moon picture this time! It wasn't full, like last time, but you get the idea.
Hopefully, I've had my share of failures for a little bit. Now if only I didn't have to say goodbye to summer vacation in one week!!
But I guess that comes with the territory of teaching!

Saturday, August 6, 2011

Grilled Artichokes

Normally, we boil our artichokes whole and eat them leaf-by-leaf, until we reach the scrumptious artichoke bottom, which is like heaven on a plate. Grilled artichokes were only something I had a restaurants... until Giada (who I am slightly infatuated with) showed me how easy it can be to do it yourself!
Grilled Artichokes
(Print Recipe)
Thank you Giada De Laurentiis

Ingredients
2 lemons, quartered
2 large artichokes
1/4 cup extra-virgin olive oil
2 cloves garlic, minced
1 tablespoon chopped fresh or dried rosemary leaves
salt and pepper
lemon wedges and melted vegan butter for serving

Directions
In an 8-quart saucepan, bring 8 cups water to a boil over high heat. Juice the lemons into the water and add the squeezed lemon shells. Using kitchen scissors, remove the thorns from the tips of the artichoke leaves. Cut the artichoke stems to 1/2-inch long. Cut each artichoke into 8 wedges and, using a paring knife, remove the fuzzy choke. Place the artichokes in the pan and bring to a boil. Cover the pan and steam until the artichoke hearts are tender, about 20 minutes. Using tongs, remove the artichokes and arrange in a single layer on a baking sheet.

Preheat a gas or charcoal grill. Drizzle both sides of the artichokes with olive oil and season with salt and teaspoon pepper. Sprinkle with the chopped garlic and rosemary. Grill, cut-side-down, until lightly charred, 5 to 6 minutes on each side. Arrange the artichokes on a platter and serve with lemon wedges and melted vegan butter.

Before the grill:
The grill left delicious char-marks!
Can I just say... oh.my.goodness. I could eat these every night this week. I love everything about them- The garlic & rosemary flavors, the smokiness the grill gives them, the heavenly taste of artichoke bottom you get in every bite... who could resist?

I served these with a simple chickpea salad. I just mixed a can of chickpeas (rinsed and drained) with fresh chopped tomatoes and cucumbers. I drizzled it with 1/4 cup of white balsamic vinegar and added fresh basil, salt and pepper. What an easy and fresh tasting side to compliment these grilled taste sensations!
If you need me, I'll be at the grill.
Every night. Making my new favorites.
 Or at least... in my dreams.

Friday, August 5, 2011

Homemade Milk and Cookies

Today is rainy and dreary. I am actually kind of loving it. We haven't had this kind of weather in so long, it is a nice change. I feel like I have an excuse to spend a lazy day inside, blogging, reading, watching movies, and staying in my yoga pants. I always love a good excuse to stay in yoga pants. Nate is not a fan- but I made it up to him by making almond milk and chocolate chip cookies to enjoy on this lazy day.
The only thing I am not loving about this rainy day, is the terrible lighting for my pictures. So I apologize for the dark shadowy images I may post (although they did start to come out better after some strategizing and light reflecting). Nate heard me grumbling about this as I was shooting in the kitchen... muttering to myself about the different equipment I need to buy so I can take a well-lit picture on a poorly-lit day. Sorry, Nate. Just a preview for the long dark winter ahead of us.

Back to the milk...
and cookies!
This was my first experience making almond milk and I have to say, it is WAY TOO EASY. How have I not done this until now? I did use the Vitamix for it, but I read that a regular blender will work too (which I was not aware of until yesterday).

Almond Milk

Ingredients
1 cup almonds
4 cups of water
Dash of salt

Directions
Soak almonds in about 2 cups of water for 8-12 hours. Put the almonds along with 4 cups of water total (the soaking water can be used toward the 4 cups) and salt in a blender. Blend for about 1-2 minutes. You can use the almond milk just like this, but for a smooth texture, strain the milk through cheese cloth. This takes awhile, so secure the cheese cloth with a rubber band, around the container you are straining it into. Then you will have your freshly made, pure almond milk!

Note: This almond milk will separate in the fridge so give it a quick shake and then it will be ready to drink!

If you prefer sweetened almond milk, add a few dates to the mixture (2-6, depending on your desired sweetness). You can also add the scrapings of one vanilla bean or a teaspoon of vanilla extract, for vanilla almond milk. For step-by-step pictures of making almond milk, look here. There are also other variations of almond milk recipes on the same page.

Then enjoy, with a fresh batch of cookies!
The cookies I made are from the new Peas and Thank You cookbook! These cookies have half the amount of sugar and butter compared to most chocolate chip cookies I have made, so I was a little leery of how they might turn out. I have to say, they certainly did not disappoint! I love that they still taste like a cookie (a light, somewhat fluffy cookie) but they are much better for you than a traditional chocolate chip cookie.

If you are not a Peas and Thank You blog reader yet, her blog is quite entertaining... funny, witty, and full of cute stories and yummy recipes. Her cookbook is the same way- Every recipe comes with a story, which is a nice change from your everyday cookbook. I have had her cookbook for 2 days now and have read almost all the stories that go along with the recipes. She cracks me up... as Nate and Lilly are both well-aware. Sorry, Nate and Lilly.

One more "sorry Nate" for today. Here is a picture of him pointing at the crazy lightning storm we were having. I think he was scared that he was going to get hit by it. So he came inside and I gave him a cookie.

Tuesday, August 2, 2011

Tofu Lettuce Wraps

I went through a phase a while back when I was obsessed with tofu lettuce wraps. It all started because I had PF Chang's vegetarian lettuce wraps for the first time and couldn't believe I had missed out on them all those years. I made so many different recipes trying to mimic PF Chang's lettuce wraps, but I never could quite get it. I finally realized that there are still plenty of fantastic lettuce wrap recipes out there, even if they don't taste exactly like the ones I was trying to copy. I couldn't get enough... or so I thought- I made them so much I had to take a break. As my dad would've said, it was too much of a good thing. So I haven't made them in a while... until tonight.
This recipe is a combination of many lettuce wrap recipes I have made. It is delicious, but I don't claim that it tastes exactly like PF Chang's recipe.

Tofu Lettuce Wraps
(Print Recipe)

head of iceberg lettuce
1 block extra firm tofu, pressed, diced in small pieces
1 tablespoon tamari (or soy sauce)
1 8-oz can water chestnuts, finely diced
1 small onion, finely diced
3 cloves garlic, minced
1 tablespoon fresh minced ginger
1/4 teaspoon red pepper flakes
3 tablespoons mirin
1 tablespoon hoisin sauce
2 teaspoons yellow mustard
1 teaspoon sesame oil
additional soy sauce, to taste
sweet chili sauce, for dipping

Directions
Preheat a non-stick skillet over medium heat. Spray with non-stick spray, add tofu and cook for about 10 minutes, flipping with a spatula occasionally. Midway through, add 1 tablespoon of tamari. Remove from pan and set aside.
Saute the onion, garlic, ginger, and red pepper flakes, until the onion is soft and browned. Add the mirin and let cook for another 3 minutes. Then add the water chestnuts, hoisin sauce, yellow mustard, and sesame oil. Stir and let cook for another minute. Add the tofu and gently stir. Add additional tamari if desired. Remove from heat. Serve with the iceberg lettuce leaves (stuff the mixture in them like a taco) and sweet chili sauce for dipping.
Other add-ins I have tried that you may like too: Diced red peppers, diced shitake mushrooms, onion powder. Any of these could be added along with the onions to saute at the same time.

If you don't know how to press tofu, here is how I do it.
This process helps remove the water from the tofu, and firm it up even more. Slice the tofu and place it between absorbent towels. Top with something heavy and wait at least 15 minutes.

I served these lettuce wraps with brown rice. I added sauteed onions, garlic, and ginger to it, along with cooked peas and a few dashes of soy sauce.
I loved this return of the lettuce wraps into my menu... I will however, try not to make them every single week, sometimes twice a week, until I get sick of them again.

Have you ever made a recipe over and over until you had too much of a good thing?

Monday, August 1, 2011

White Bean and Artichoke Salad

Is it really August already? It feels like it was June yesterday. The summers especially fly by for me, since I am a teacher and on summer vacation. Vacation days are always shorter than work days. To celebrate the flavors of summer today, I made this bean, veggie, and herb salad. Simple summer flavors come together so easily when you have just completed your grocery/farmer's market shopping for the week. I had a hard time deciding what not to put in this, I could've easily thrown it all in there! I limited myself though- must keep it simple- must save some veggies for the rest of the week.
The cucumbers I used are called lemon cucumbers. I got them from the farmer's market because they looked interesting. They look kind of like a yellow tomato, but taste similar to a regular cucumber, with a little more crunch. Any kind of cucumber would be good in this salad.
White Bean and Artichoke Salad
(Print Recipe)

Ingredients
2 can white beans, drained and rinsed
1 jar artichoke hearts, drained and roughly chopped (I used the water-packed ones, with stems included on them)
1 red pepper, diced
1 medium tomato, chopped
1 cucumber, chopped
1/4 cup fresh basil, chopped
1/4 cup fresh cilantro, chopped
1/4 cup white balsamic vinegar (you could use regular balsamic instead)
3 tablespoons regular balsamic vinegar
1/2 lemon, juiced
salt and pepper to taste
Baby arugula leaves

Directions
Combine all ingredients except arugula, stir gently, cover and chill for several hours to let the flavors blend. Serve over a bed of baby arugula leaves.
I love the light peppery bite the arugula adds to the dish. You could easily add/take out any veggies in here- just use the basic ingredients: white beans and artichokes, then create your own favorite flavor combinations!
August, please hang around for awhile.