Showing posts with label gluten free. Show all posts

Tuesday, July 3, 2012

Orange Peach Carrot Juice

I'm back with another juice recipe! This one comes in a close second to the beet juice I previously blogged about, and it is my husband's favorite so far. This orange peach carrot juice has a beautiful orange hue to it, almost like an orange creamsicle.
Once again, you start with simple, fresh ingredients, blend them, strain them, and sip all the delicious vitamins and nutrients through a straw.
Orange Peach Carrot Juice
Makes 2 servings (about 4 cups)

Ingredients:
2 peeled oranges
2 peaches, quartered, seeds removed
4-5 medium carrots, halved
Juice from one lemon
1/2 inch ginger
2 cups water

Directions:
Place all ingredients in the Vitamix (or other high-speed blender), blend on full speed 1-2 minutes. Strain through a nut milk bag, into a large bowl. Squeeze to release all excess juices. Serve in a chilled glass and enjoy!
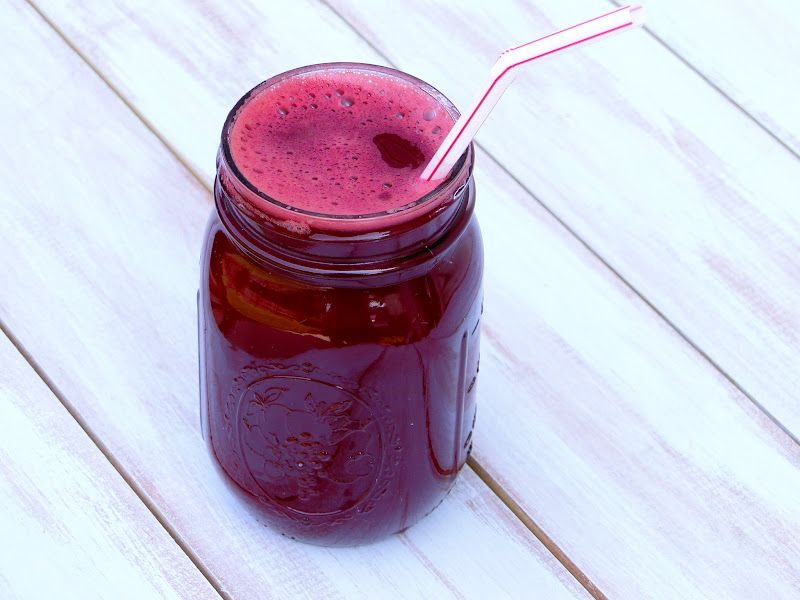
I love having fresh juice for breakfast. I especially love having fresh juice for breakfast when it's already made for me, because the second serving is waiting in a mason jar, from yesterday!

Thursday, June 28, 2012

Beet Carrot Apple Juice

Recently I've been making fresh juices, using my Vitamix. I know it's not quite the same as drinking juice from a juicer, but I am making due with what I have, and I have to say it's been pretty tasty! I've made about 5 different concoctions so far, and this Beet Carrot Apple Juice has been by far my favorite.
Basically you start with these simple, fresh ingredients...
Blend them in the Vitamix, strain them through a nut milk bag, and your juice is ready! Here is the process in a nutshell.
Since I am using a Vitamix, not a juicer, I need to add some water too, which is fine, because that equals more juice for me to drink (and it doesn't taste too watered down to me at all)! This recipe makes two servings, so I save one for later, in a canning jar in the fridge.
I like to drink the freshly made one in a chilled glass with a few ice cubes- I prefer my juice ice-cold! This process definitely takes some time, and has a good amount of clean-up involved, but it helps that it makes TWO servings, not just one.

I had a little helper who came out back to watch me shoot photos... but she soon found a "comfy" bed to lay on and heat up in (aka, our grill cover that had blown off). I don't know how she could stand it- it was already at least 80 degrees outside.
Beet Carrot Apple Juice
Makes 2 servings (about 4 cups)

Ingredients:
2 beets, peeled and quartered
2 apples, quartered and cored
4 carrots, halved
Juice from one lemon
1/2 inch of ginger (or more, if you prefer)
2 cups water

Directions:
Place all ingredients in the Vitamix, blend on full speed 1-2 minutes. Strain through a nut milk bag, into a large bowl. Squeeze to release all excess juices. Serve in a chilled glass and enjoy!

Note: If you do not have a high-powered blender, like a Vitamix, I am not sure how well these ingredients would blend up, to make a juice. Please let me know if you try!
I plan on making lots more fresh juices throughout the summer- and will hopefully be back to share a few more favorite combinations!

Saturday, February 25, 2012

Green Spiced Smoothie

Since the beginning of the new year I have been into making green smoothies for breakfast. It's the perfect breakfast option for me because it is packed full of nutrients and I can take it to-go! This is my newest creation that I am actually currently enjoying as I type this.
If you don't have a high powered blender (I was lucky enough to get a Vitamix recently and LOVE it), I would suggest replacing the kale with spinach. The kale is much more fibrous and harder to break down- which may result in the kale not completely blending in your smoothie. Or maybe that doesn't bother you- in that case, go for it!

Green Spiced Smoothie
Serves 2
(Print Recipe)

Ingredients
2 cups kale, stems removed (if you use spinach, no need to remove stems)
1 cup almond milk
3/4 cup filtered water, or additional almond milk if you prefer
2 sliced and frozen bananas
1 thin slice fresh ginger (I throw it in the blender un-peeled. You could also grate it first, enough to equal about 1/2 teaspoon, or more if you like it with a kick!)
1/2 teaspoon vanilla
1/4 teaspoon cinnamon
2 pinches each of ground cardamom, cloves, and nutmeg
dash freshly ground pepper
6 ice cubes

Put everything in the blender and blend until smooth.
It's just like a chai flavored smoothie, but green! Try it, and adjust the spices to your taste.

Here are a few bird pictures my husband recently took of birds in our backyard. At any given time, if we look outside, there are birds on our fence, feeder, tree, and grass. All just hanging out or eating.
Three birds crammed onto one feeder.
Even a woodpecker!
We haven't had any snow yet this year. I always love the contrast of the birds against freshly fallen snow. Oh well, spring is on it's way, and I'm not complaining!

Monday, December 19, 2011

Chocolate and Peppermint

I decided to go with a chocolate and peppermint theme for my homemade christmas gifts this year. That flavor combination always tastes best to me at Christmas time. In fact, the rest of the year, I think I forget about it. I used these little jars to put all my baked goods in, and made them look festive with some ribbons, red paper, and candy canes.
The bottom layer of the jar consists of balsamic fudge drop cookies (recipe found here). I used 1/2 teaspoon peppermint extract in place of the vanilla, and I used crushed candy canes in place of the vanilla sugar. I love these cookies and have made them every Christmas, ever since I discovered the recipe a few years ago.
I made a double batch of these... TWICE. The picture below shows one batch of a double recipe. Got milk? (The almond variety, of course.)
The next layer consists of both peppermint fudge and coconut fudge (recipe found here). This recipe couldn't be any easier! It was by far the simplest thing I made- and just as delicious, chocolatey, and pepperminty, as everything else! (The coconut fudge is not pictured, because I decided to make it at the end of my baking marathon/photo shoot, since the peppermint one was so easy to make!)
The top layer in my gift jars is my absolute favorite- peppermint bark! I make this every year, but this year was different because I decided to make the white chocolate myself (recipe found here), so it would be dairy free! The hardest part of this was finding the ingredients. I had to go to several health food stores in order to find food grade cocoa butter and powdered soy milk. Actually making the white chocolate was the easy part, once I finally had all the ingredients. Note: you must QUADRUPLE this recipe for white chocolate, in order to have enough for the peppermint bark recipe below.
Once I made the white chocolate, I followed this recipe to make the peppermint bark (there is no need to harden the white chocolate in molds and then remelt it for the peppermint bark- just use the freshly made, warm/liquid white chocolate).

Peppermint Bark
(Print Recipe)

Ingredients:
12 ounces chocolate chips
1 pound white chocolate (If you use store-bought, make sure it is the kind made with real cocoa butter- it makes such a difference!)
1/2 teaspoon peppermint extract
1/2 cup candy canes (or more), crushed

Directions:
Preheat oven to 250 degrees. Line a 9x13 inch pan with foil, letting it hang over the sides. Spray foil with oil. Pour the chocolate chips in an even layer on the foil. Place in oven for 5 minutes. Remove from oven, smooth with spatula or knife. Place in refrigerator until cold and firm (about 20 minutes).

Melt white chocolate in a double boiler (or follow and quadruple the recipe above, to make your own white chocolate). Stir in the peppermint extract. Pour the melted white chocolate over the chilled chocolate layer and spread it quickly and evenly. Sprinkle with crushed candy canes.

Chill until both layers are firm. Lift foil out of pan and shake off excess candy. Trim edges. Cut into 2 inch wide strips. Peel bark from foil and cut each strip as desired. Chill in a covered container.
To my family who will be receiving these goodies in the mail: First of all, SURPRISE, this is your gift from me. Second of all, don't be too disappointed when they don't arrive in this pretty package- I don't think they'd make it through the mail that way- think more along the lines of tupperware, with all the same treats inside.
Happy baking!

Wednesday, November 23, 2011

Cranberry Sauce with Pears & Pomegranates

This was my first attempt at making homemade cranberry sauce and I have to say it turned out well! I only tasted a few bites because I have to save it for tomorrow. I love how pretty the berries looked, covered in sugar!
My absolute favorite breakfast in the winter, is pomegranates and oranges! (Photo from my Iphone, on Instagram.)
This recipe combined both of these ingredients, along with the cranberries, so I couldn't pass it up!
The sweetness of the pears adds a nice aspect to the sauce too!

Cranberry Sauce with Pears and Pomegranates
Adapted from Family Fresh Cooking

Ingredients
12 ounces fresh or frozen Cranberries
1 Pear-cleaned, cored & diced, skin left on
juice from 1 Orange (about 1/4 cup)
1/4 cup water
1/2 teaspoon of ground Cinnamon
pinch of ground Ginger
Pinch of Nutmeg
3/4 cups sugar (more or less to taste)
2 ounces Pomegranate Seeds plus extra for garnish
Orange Zest

Directions

Rinse fresh cranberries. Place cranberries, orange juice, pear, water and spices in a medium saucepan. Heat on stove top over medium heat until boiling. Reduce heat to a simmer, partially cover with a lid and cook for about 10 minutes. The cranberries will burst and the sauce will thicken a bit. Add more water or orange juice if you want a thinner sauce. Stir occasionally so your sauce does not burn. Add sweetener to taste and adjust spices if needed.

Add pomegranate seeds at the end and gently stir them into the sauce. As this sauce cools it will continue to thicken a bit. Serve topped with fresh pomegranate seeds and grated orange zest.
I realize this recipe is a little late for Thanksgiving... but maybe keep it in mind for Christmas!

Since I haven't blogged in awhile, I thought I'd share a few pictures from the last month. Fall is my absolute favorite time of year! We took a day trip to the mountains (as we do every October) and I snapped a picture of my favorite tree in Blowing Rock!
And what would a trip to the mountains be, without a cute little dog tagging along?
Pretty Berries!
And another photo courtesy of my Iphone and Instagram (my newest obsession... my poor camera has been slightly neglected). This was taken on my way to work!
We went for a few walks at the lake near us.
Not too long ago, the woods behind our house looked like this.
Now, not so much.
That's the only bad thing about Fall... it never lasts long enough. I guess that's part of the novelty of it all!

Happy Thanksgiving Everyone!

Monday, September 5, 2011

Pumpkin Spice Latte

Happy Labor Day! To celebrate the long weekend and the beginning of September, I broke out a few Fall decorations and made pumpkin spice lattes! It is rainy here today, so I have had plenty of time to spend in the house. I'm just happy I have the day off. Look at this frothy deliciousness.
I already had all the ingredients (thankfully). The pumpkin pie syrup was leftover from last year. I got it at World Market. Here is everything you need to make this taste of fall latte.
Pumpkin Spice Latte
(Print Recipe)

Ingredients
1 cup unsweetened almond milk
1/2 cup double strength coffee
2 tablespoons pumpkin pie syrup or pumpkin spice syrup (I used sugar free)
a few pinches of pumpkin pie spice
Truvia or any sweetener, to taste (optional) I used one teaspoon

Directions
Heat one cup of almond milk in the microwave or on the stovetop, until heated but not boiling. Stir in syrup and a pinch of pumpkin pie spice. Froth with a milk frother, until slightly foamy. Pour into a large mug. Pour coffee on top. Sprinkle with a pinch of pumpkin pie spice. Stir in additional sweetener if desired.

This recipe can easily be adjusted to your taste. Add more coffee for a stronger latte, or use espresso. Or make it a steamer, and don't add any coffee! The only thing that really has calories in this recipe (if you use sugar free syrup) is the almond milk, which is only 35 calories per cup! One of the many reasons I LOVE almond milk.
While drinking this, I may have added a few pins to my Fall Pinterest pin board. And here are a few of my decorations that I put out so far.
Can you tell I'm excited about the change in seasons? The weather hasn't even started to change here yet, but I'm doing as much as I can to make it feel like Autumn! Sipping pumpkin spice latte's always makes it feel a little more like Fall.

Saturday, August 20, 2011

The Intermingling of Summer and Fall

I got my first taste of Fall today! Literally. We got Honeycrisp apples at the farmer's market. From what I have observed, these apples are only available in the Fall (In North Carolina anyway). They are appropriately described as "explosively crisp" on the Honeycrsip website I checked out today. While it still feels like summer here and there are still plenty of summer fruits and veggies available, I was pleased to dip into this Fall flavor I love so much!

We got cherries and Honeycrisps at the market today.
A beautiful combination of Summer and Fall flavors.
Simple. Pretty. Colorful.
After tasting this apple, my mind has been in complete Autumn mode the rest of the day. My little sweetheart Lilly turns five tomorrow! I decided to make her "Pumpkin Muttins" as a birthday treat. The entire house smelled of pumpkin goodness.
These muffins are so good- I tried a piece, and people can not only eat, but enjoy these! This recipe is much sweeter than other dog treat recipes I have made, so give them sparingly to your pet!
Pumpkin Muttins
(Print Recipe)
Adapted from Organic Dog Biscuit Cookbook

Ingredients
1 cup oat flour
1 cup brown rice flour
2 teaspoons cinnamon
2 teaspoons baking powder
1/2 teaspoon baking soda
1/2 teaspoon ground cloves
3 flax eggs (3 tablespoons flaxseed meal, mixed with 1/2 cup water plus one tablespoon water)
3/4 cups honey
1/4 cup safflower oil or canola oil
1 15 ounce can pumpkin
pepita seeds for garnish

Directions
Preheat the oven to 350 degrees. Line a mini muffin pan with cupcake liners. Mix the flax egg and set aside. Mix the dry ingredients in a large bowl. Make a well in the dry ingredients. Pour all wet ingredients into the well, including the flax egg (make sure it has thickened up first). Mix the wet ingredients together, then begin mixing in the dry ingredients until everything is well combined. Pour into cupcake liners in the mini muffin pan. Fill all the way to the top- these will not rise much. Stick one pepita seed into the center of each muffin, so it is showing half way. Bake 15-17 minutes, or until a toothpick inserted into the center of the muffin comes out clean. Let cool completely. Store in a sealed container in the fridge or freezer.

This is before I baked them. Notice how much I filled them.
And here they are all ready for pups to enjoy!
Happy birthday Lilly!
Enjoy your pumpkin muttins!
And I'll enjoy the intertwining flavors of Summer and Fall!
And maybe... just maybe, I'll have a pumpkin muttin too... don't judge me. You'd eat one if you knew how good they were :)