Showing posts with label summer. Show all posts

Tuesday, July 3, 2012

Orange Peach Carrot Juice

I'm back with another juice recipe! This one comes in a close second to the beet juice I previously blogged about, and it is my husband's favorite so far. This orange peach carrot juice has a beautiful orange hue to it, almost like an orange creamsicle.
Once again, you start with simple, fresh ingredients, blend them, strain them, and sip all the delicious vitamins and nutrients through a straw.
Orange Peach Carrot Juice
Makes 2 servings (about 4 cups)

Ingredients:
2 peeled oranges
2 peaches, quartered, seeds removed
4-5 medium carrots, halved
Juice from one lemon
1/2 inch ginger
2 cups water

Directions:
Place all ingredients in the Vitamix (or other high-speed blender), blend on full speed 1-2 minutes. Strain through a nut milk bag, into a large bowl. Squeeze to release all excess juices. Serve in a chilled glass and enjoy!
I love having fresh juice for breakfast. I especially love having fresh juice for breakfast when it's already made for me, because the second serving is waiting in a mason jar, from yesterday!

Thursday, June 28, 2012

Beet Carrot Apple Juice

Recently I've been making fresh juices, using my Vitamix. I know it's not quite the same as drinking juice from a juicer, but I am making due with what I have, and I have to say it's been pretty tasty! I've made about 5 different concoctions so far, and this Beet Carrot Apple Juice has been by far my favorite.
Basically you start with these simple, fresh ingredients...
Blend them in the Vitamix, strain them through a nut milk bag, and your juice is ready! Here is the process in a nutshell.
Since I am using a Vitamix, not a juicer, I need to add some water too, which is fine, because that equals more juice for me to drink (and it doesn't taste too watered down to me at all)! This recipe makes two servings, so I save one for later, in a canning jar in the fridge.
I like to drink the freshly made one in a chilled glass with a few ice cubes- I prefer my juice ice-cold! This process definitely takes some time, and has a good amount of clean-up involved, but it helps that it makes TWO servings, not just one.

I had a little helper who came out back to watch me shoot photos... but she soon found a "comfy" bed to lay on and heat up in (aka, our grill cover that had blown off). I don't know how she could stand it- it was already at least 80 degrees outside.
Beet Carrot Apple Juice
Makes 2 servings (about 4 cups)

Ingredients:
2 beets, peeled and quartered
2 apples, quartered and cored
4 carrots, halved
Juice from one lemon
1/2 inch of ginger (or more, if you prefer)
2 cups water

Directions:
Place all ingredients in the Vitamix, blend on full speed 1-2 minutes. Strain through a nut milk bag, into a large bowl. Squeeze to release all excess juices. Serve in a chilled glass and enjoy!

Note: If you do not have a high-powered blender, like a Vitamix, I am not sure how well these ingredients would blend up, to make a juice. Please let me know if you try!
I plan on making lots more fresh juices throughout the summer- and will hopefully be back to share a few more favorite combinations!

Sunday, May 13, 2012

Strawberry Jam

With all the delicious fresh strawberries I have been seeing at the Farmer's Market recently, I decided it was finally time to make my first batch of homemade strawberry jam. I remember "helping" my mom make jam when I was young (I think this consisted of mostly eating berries, and maybe a small amount of mashing the berries for her, followed by eating more berries). We bought 4 over-flowing quarts and brought them home. This is less than half of the berries.
Here they are on my lap, on the way home, compliments of my Instagram.
I admit, I was a little nervous about ruining the whole batch, so I called my mom a few times before starting the jam, asking for advice. After searching the internet and looking at several strawberry jam recipes, I decided to use the same recipe my mom has used for years- the one that comes with the "Sure-Jell" fruit pectin. It calls for 5 cups of crushed strawberries (about 4 pints), 7 cups of sugar (yes, you read that right) and a package of fruit pectin. After some slightly burned finger tips, here is what I ended up with!
As I was in the process of making jam, I also had homemade bread rising! Nothing beats homemade bread, topped with freshly made jam. It reminded me of after-school snacks, when I was growing up.
YUM!
On another note, we made hummingbird food yesterday for the first time this season, and they have already returned to our backyard!
They were loving the rain today.
I had a busy but relaxing weekend, finally completing some little crafty projects I have been wanting to do for awhile. More blog posts to follow soon (I hope!)

Saturday, August 20, 2011

The Intermingling of Summer and Fall

I got my first taste of Fall today! Literally. We got Honeycrisp apples at the farmer's market. From what I have observed, these apples are only available in the Fall (In North Carolina anyway). They are appropriately described as "explosively crisp" on the Honeycrsip website I checked out today. While it still feels like summer here and there are still plenty of summer fruits and veggies available, I was pleased to dip into this Fall flavor I love so much!

We got cherries and Honeycrisps at the market today.
A beautiful combination of Summer and Fall flavors.
Simple. Pretty. Colorful.
After tasting this apple, my mind has been in complete Autumn mode the rest of the day. My little sweetheart Lilly turns five tomorrow! I decided to make her "Pumpkin Muttins" as a birthday treat. The entire house smelled of pumpkin goodness.
These muffins are so good- I tried a piece, and people can not only eat, but enjoy these! This recipe is much sweeter than other dog treat recipes I have made, so give them sparingly to your pet!
Pumpkin Muttins
(Print Recipe)
Adapted from Organic Dog Biscuit Cookbook

Ingredients
1 cup oat flour
1 cup brown rice flour
2 teaspoons cinnamon
2 teaspoons baking powder
1/2 teaspoon baking soda
1/2 teaspoon ground cloves
3 flax eggs (3 tablespoons flaxseed meal, mixed with 1/2 cup water plus one tablespoon water)
3/4 cups honey
1/4 cup safflower oil or canola oil
1 15 ounce can pumpkin
pepita seeds for garnish

Directions
Preheat the oven to 350 degrees. Line a mini muffin pan with cupcake liners. Mix the flax egg and set aside. Mix the dry ingredients in a large bowl. Make a well in the dry ingredients. Pour all wet ingredients into the well, including the flax egg (make sure it has thickened up first). Mix the wet ingredients together, then begin mixing in the dry ingredients until everything is well combined. Pour into cupcake liners in the mini muffin pan. Fill all the way to the top- these will not rise much. Stick one pepita seed into the center of each muffin, so it is showing half way. Bake 15-17 minutes, or until a toothpick inserted into the center of the muffin comes out clean. Let cool completely. Store in a sealed container in the fridge or freezer.

This is before I baked them. Notice how much I filled them.
And here they are all ready for pups to enjoy!
Happy birthday Lilly!
Enjoy your pumpkin muttins!
And I'll enjoy the intertwining flavors of Summer and Fall!
And maybe... just maybe, I'll have a pumpkin muttin too... don't judge me. You'd eat one if you knew how good they were :)

Wednesday, August 10, 2011

Random

Summer is coming to an end for me.
I wish it wasn't so!

This week hasn't exactly been successful as far as recipe sharing goes. Earlier in the week I made a red bean and barley bowl that was definitely blog-worthy. The only problem... I skipped breakfast (tsk, tsk) and made lunch late, so by the time my lunch was ready to eat, I was ready to eat too- not ready to spend time taking pictures of the mouth-watering lunch I had made on a very empty stomach. Don't worry though, I do plan on making this again, and hopefully will find it in me to take 10 extra minutes to snap some pictures.

I also made some doughnuts that I first tried at Lacey's puppy party. They were so delicious and I was really looking forward to using my new doughnut pan as well as eating these sugary little treats. There was a slight problem though. You see, my baking soda and baking powder both come in red canisters. The recipe called for 1 and 1/2 teaspoons of baking powder. I bet you can guess what I used instead, because I wasn't paying attention. Lets say they looked much better than they tasted. The metallic after-taste made this recipe a fail. BUT they are a total success if you follow the recipe (found here) correctly.
Tonight, I was excited to try a new recipe, wild rice salad with oranges and roasted beets. From start to finish, this took me about two hours to make. Now, not all of that time was prep-time, but I had to wait an hour for the beets and rice to cook and I had to wait for them to cool before putting the salad together. Basically, I made a big, beet stained mess and all I have is a sub-par recipe to show for it. I ate it, so it wasn't horrible, but it is definitely not blog-worthy, and I will definitely not be making it again. Oh so disappointing, to spend that much time on something that turns out not as expected. It comes with the territory of trying lots of new recipes though!

Remember the green-horned caterpillar we found on our tomato plants? Well, look what Nate found today! EWWWWWWWW!
I think those are it's eggs? The first one we found didn't gross me out like this one did!
Actually, it's probably a good thing I am not sharing a new recipe on here today, because this would probably ruin your appetite. Surprisingly, none of our tomatoes have been eaten, and our tomato plants seem to be fine too. But apparently green-horned caterpillars come with the territory of tomato growing.
I'll end on a little success I actually had. Remember the moon pictures that Nate and I took? I was finally able to get some detail on a moon picture this time! It wasn't full, like last time, but you get the idea.
Hopefully, I've had my share of failures for a little bit. Now if only I didn't have to say goodbye to summer vacation in one week!!
But I guess that comes with the territory of teaching!

Monday, August 1, 2011

White Bean and Artichoke Salad

Is it really August already? It feels like it was June yesterday. The summers especially fly by for me, since I am a teacher and on summer vacation. Vacation days are always shorter than work days. To celebrate the flavors of summer today, I made this bean, veggie, and herb salad. Simple summer flavors come together so easily when you have just completed your grocery/farmer's market shopping for the week. I had a hard time deciding what not to put in this, I could've easily thrown it all in there! I limited myself though- must keep it simple- must save some veggies for the rest of the week.
The cucumbers I used are called lemon cucumbers. I got them from the farmer's market because they looked interesting. They look kind of like a yellow tomato, but taste similar to a regular cucumber, with a little more crunch. Any kind of cucumber would be good in this salad.
White Bean and Artichoke Salad
(Print Recipe)

Ingredients
2 can white beans, drained and rinsed
1 jar artichoke hearts, drained and roughly chopped (I used the water-packed ones, with stems included on them)
1 red pepper, diced
1 medium tomato, chopped
1 cucumber, chopped
1/4 cup fresh basil, chopped
1/4 cup fresh cilantro, chopped
1/4 cup white balsamic vinegar (you could use regular balsamic instead)
3 tablespoons regular balsamic vinegar
1/2 lemon, juiced
salt and pepper to taste
Baby arugula leaves

Directions
Combine all ingredients except arugula, stir gently, cover and chill for several hours to let the flavors blend. Serve over a bed of baby arugula leaves.
I love the light peppery bite the arugula adds to the dish. You could easily add/take out any veggies in here- just use the basic ingredients: white beans and artichokes, then create your own favorite flavor combinations!
August, please hang around for awhile.

Monday, July 25, 2011

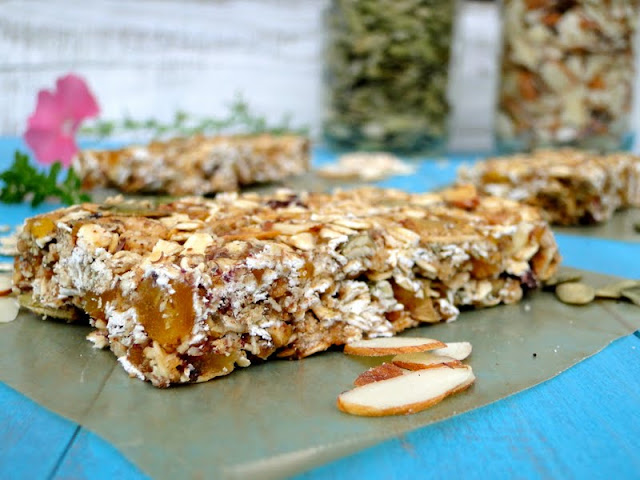
Granola Bars

We finally had a small break from the heat! It rained a little, late this afternoon and cooled it down enough for me to venture outside with my camera for a little bit. It was great timing, because tonight I made these.
I experimented with this recipe last week and was disappointed with how crumbly they turned out, but the taste was great. I tweaked it a little this time and it came out much better- I could actually cut them into bars this time! Here are all the ingredients I used.
I mixed them together, and pressed them into a pan. Note: Do NOT follow my example of using wax paper- parchment paper works much better, but I was out! The wax paper stuck to the bottom of the bars and I had to carefully peel it off piece by piece.
Then cut them into delicious bars.
Here's the recipe, so you can do it too!

Granola Bars
(Print Recipe)
Adapted from Ina Garten

Ingredients
2 cups oats
1/2 cup shredded coconut, unsweetened
1/2 cup sliced almonds
1/2 cup pepita seeds
1 1/2 cups dried fruit, well chopped (I used mango and cranberries)
3/4 cup rice krispie cereal
1/4 cup flax meal
1 tsp vanilla extract
1/2 tsp almond extract (optional)
1/4 tsp sea salt
1/3 cup maple/agave blend (or just pure agave or pure maple syrup)
1/3 cup almond butter

Directions
Preheat the oven to 350 degrees F.
Toss the oatmeal, almonds, pepita seeds, and coconut together on a sheet pan and bake for 10 to 12 minutes, stirring occasionally, until lightly browned. Transfer the mixture to a large mixing bowl and stir in the flax meal and cereal.
Reduce the oven temperature to 300 degrees F.
Place the almond butter, maple/agave blend, almond extract, vanilla, and salt in a small saucepan and bring to a boil over medium heat. Cook and stir for a minute, then pour over the toasted oatmeal mixture. Add the chopped dried fruit and stir well.
Pour the mixture into a parchment lined 8x12 baking pan. Wet your fingers and lightly press the mixture evenly into the pan. Press the mixture well! Bake for 25 to 30 minutes, until light golden brown. Cool for at least 2 to 3 hours before cutting into squares or bars. Serve at room temperature.
Hints: 
1. Make sure your dried fruit is chopped well to help everything stick together. I put mine in the food processor to make it easier on myself. 
2. Also make sure you stir the wet mixture very well with the dry mixture before pouring into the pan. Use your hands if you find that works better (I did). 
3. Make sure you use slightly wet hands to press this mixture into the pan and pack as tightly as possible.
4. Most important hint- Let cool completely before cutting. I put mine in the fridge for 30 minutes and then the freezer for 30 minutes, so I didn't have to wait 3 hours for them to cool. I am too impatient to wait that long!
I cut mine into 12 large bars. I think I may cut them in half to make smaller squares.

I'm not sure how many recipes I will have to share this week. As I have stated before, I am a menu planner. Lately I have been trying several new recipes every week- usually 4 or 5! This week, for some reason, menu planning was a struggle... I was not inspired to try many new things. I ended up deciding to make mostly tried and true recipes. Here is my attempt at organization (I have been doing this since I started the whole menu planning thing). 
I always post upcoming appointments here, along with our menu, and a running shopping list of pantry staples that we run out of. As you can see from our menu, most of our meals are recipes I have shared on here before. I may have to find something else to blog about this week! Don't let this fool you, as I said, this is a small attempt on organization... I am not nearly as organized as I would like to be! Actually, there are still granola crumbs on the counter right now as I type this, I am not good at cleaning up messes right away either- Nate can attest to that. I have better things to do! Like blog about the mess I just created. And Pinterest pretty pictures of organization, photography, and well-lit spotless kitchens. A girl can dream, right? 

Besides granola bars, this is what I have been snacking on lately. I know you are surprised to see pictures of fruit on this blog. I never take pictures of fruit.
They were $1.99 a pound! I couldn't resist.
Check out the condensation. Even though there was a slight cool down, there is always the lovely humidity here.
I'm going to go clean up those granola bar crumbs now. Really, I am. I will not be on Pinterest first.

Friday, July 22, 2011

Barley Taco Salad

I cannot believe how hot it has been this week (I know, I know, I am not the only one). It has been a struggle for me to cook and even more of a struggle for me to photograph what I have cooked, in the sweltering heat outside (but there is oh such wonderful lighting)! My camera lens immediately fogs up when I take it from the house to the backyard. Not to mention the fact that I feel sweat forming on my forehead within 30 seconds of being out there... And I can't breathe... The air is so thick and humid... And Lilly barks because she wants me to open the door so she can join me (and sniff the food I am taking pictures of). Then she barks less than a minute later to go back inside. Because it is too hot. This scenario has been repeated several times. True story.

So, if you are wondering why I haven't posted as often as usual this week, read the above paragraph, again. I did take a few quick pictures of today's dinner, which was super yummy! It is a good filling salad for the summer. You will have to use your stovetop for a little bit, but at least not your oven.
Barley Taco Salad
(Print Recipe)

Ingredients
1 cup barley (optional: soak overnight)
1 cup sliced cherry tomatoes
1 green pepper, chopped
2 ears corn, cooked and kernels removed
1 avocado, cubed (drizzled with lemon juice)
1 can black beans, drained and rinsed
Juice from one lime
1/4 cup cilantro
1/2 cup fresh salsa
Salt and pepper to taste
Optional: red pepper flakes
Romaine Lettuce, chopped

Directions
Cook the barley with 2 and 1/2 cups water until all water is absorbed (about 30 minutes). Add all the ingredients to a large bowl. Stir well, add salt and pepper to taste, sprinkle on some red pepper flakes for extra spiciness. Serve over a bed of chopped romaine.
So delicious on a 100 degree summer day! I love all the colors in there too.
I hope everyone else is finding a way to stay cool! I am grateful we have air conditioning- I know my family, friends, and fellow bloggers who are in the New England area might not have that luxury since it is needed so scarcely. Oh, but you do have rivers nearby to cool off in! I wish we had something like that close to Charlotte.

Happy salad making.