Showing posts with label menu. Show all posts

Monday, July 25, 2011

Granola Bars

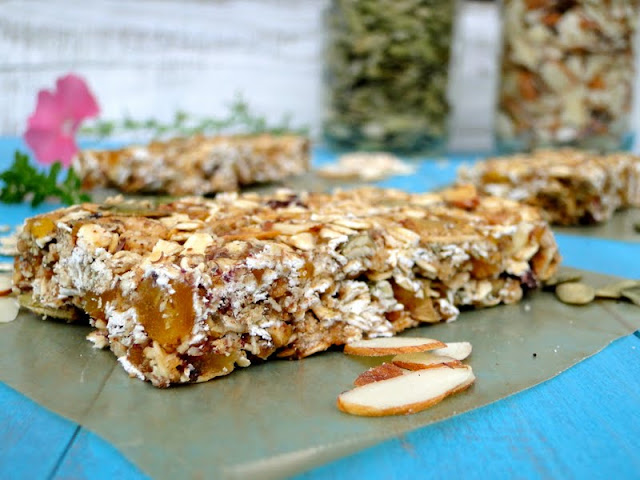
We finally had a small break from the heat! It rained a little, late this afternoon and cooled it down enough for me to venture outside with my camera for a little bit. It was great timing, because tonight I made these.
I experimented with this recipe last week and was disappointed with how crumbly they turned out, but the taste was great. I tweaked it a little this time and it came out much better- I could actually cut them into bars this time! Here are all the ingredients I used.
I mixed them together, and pressed them into a pan. Note: Do NOT follow my example of using wax paper- parchment paper works much better, but I was out! The wax paper stuck to the bottom of the bars and I had to carefully peel it off piece by piece.
Then cut them into delicious bars.
Here's the recipe, so you can do it too!

Granola Bars
(Print Recipe)
Adapted from Ina Garten

Ingredients
2 cups oats
1/2 cup shredded coconut, unsweetened
1/2 cup sliced almonds
1/2 cup pepita seeds
1 1/2 cups dried fruit, well chopped (I used mango and cranberries)
3/4 cup rice krispie cereal
1/4 cup flax meal
1 tsp vanilla extract
1/2 tsp almond extract (optional)
1/4 tsp sea salt
1/3 cup maple/agave blend (or just pure agave or pure maple syrup)
1/3 cup almond butter

Directions
Preheat the oven to 350 degrees F.
Toss the oatmeal, almonds, pepita seeds, and coconut together on a sheet pan and bake for 10 to 12 minutes, stirring occasionally, until lightly browned. Transfer the mixture to a large mixing bowl and stir in the flax meal and cereal.
Reduce the oven temperature to 300 degrees F.
Place the almond butter, maple/agave blend, almond extract, vanilla, and salt in a small saucepan and bring to a boil over medium heat. Cook and stir for a minute, then pour over the toasted oatmeal mixture. Add the chopped dried fruit and stir well.
Pour the mixture into a parchment lined 8x12 baking pan. Wet your fingers and lightly press the mixture evenly into the pan. Press the mixture well! Bake for 25 to 30 minutes, until light golden brown. Cool for at least 2 to 3 hours before cutting into squares or bars. Serve at room temperature.
Hints: 
1. Make sure your dried fruit is chopped well to help everything stick together. I put mine in the food processor to make it easier on myself. 
2. Also make sure you stir the wet mixture very well with the dry mixture before pouring into the pan. Use your hands if you find that works better (I did). 
3. Make sure you use slightly wet hands to press this mixture into the pan and pack as tightly as possible.
4. Most important hint- Let cool completely before cutting. I put mine in the fridge for 30 minutes and then the freezer for 30 minutes, so I didn't have to wait 3 hours for them to cool. I am too impatient to wait that long!
I cut mine into 12 large bars. I think I may cut them in half to make smaller squares.

I'm not sure how many recipes I will have to share this week. As I have stated before, I am a menu planner. Lately I have been trying several new recipes every week- usually 4 or 5! This week, for some reason, menu planning was a struggle... I was not inspired to try many new things. I ended up deciding to make mostly tried and true recipes. Here is my attempt at organization (I have been doing this since I started the whole menu planning thing). 
I always post upcoming appointments here, along with our menu, and a running shopping list of pantry staples that we run out of. As you can see from our menu, most of our meals are recipes I have shared on here before. I may have to find something else to blog about this week! Don't let this fool you, as I said, this is a small attempt on organization... I am not nearly as organized as I would like to be! Actually, there are still granola crumbs on the counter right now as I type this, I am not good at cleaning up messes right away either- Nate can attest to that. I have better things to do! Like blog about the mess I just created. And Pinterest pretty pictures of organization, photography, and well-lit spotless kitchens. A girl can dream, right? 

Besides granola bars, this is what I have been snacking on lately. I know you are surprised to see pictures of fruit on this blog. I never take pictures of fruit.
They were $1.99 a pound! I couldn't resist.
Check out the condensation. Even though there was a slight cool down, there is always the lovely humidity here.
I'm going to go clean up those granola bar crumbs now. Really, I am. I will not be on Pinterest first.

Sunday, May 22, 2011

Menus for People, Menus for Dogs

Happy Sunday! Check out these beautiful flowers Nate brought home.
This morning I planned our menu for the week from the comfort of my couch. Lilly was sitting with me, when I had to get up to get another cookbook. I came back to this.
The cutest little menu planner I have ever seen.
Lilly's menu plan is oats and veggies mixed with her Taste of the Wild dog food. Every day. For breakfast and dinner. She can't get enough of this stuff! I swear she has had a new zest for life ever since we started mixing the Sojos with her dog food. She never used to eat her food right away when we would feed her... and when she did eat, she would pick at it and eat slowly. She also always used to sleep in all the time but now she wants to get up early so she can eat her beloved breakfast blend. She seems to have more energy too. Sometimes I wish she'd still sleep in though :) Call me a crazy dog person, but I'm happy that she enjoys eating so much now. She should enjoy it, right?
This is the menu I came up with for Nate and I this week. I am hoping to take pictures of Monday's recipe and share it on here soon. We stumbled upon this recipe last week and loved it. It is delicious and actually healthier than it sounds- no cream involved!
Yesterday, I went to Crate and Barrel to find a small kitchen trinket, because I had ten dollars left on a gift card from there. Instead, I came home with this.
A smoothie maker! It was too perfect AND too good of a deal to pass up. It was on sale and also came with a twenty dollar rebate. I love it because it also came with 4 (BPA FREE) travel cups that you can use to blend the smoothie in too! No transferring the smoothie from the blender to the cup... which means fewer dishes to wash. We desperately need fewer dishes to wash, especially with all the cooking we do. Nate and I shared one this morning because we didn't have enough almond milk to make two.
I also saw a yummy looking smoothie recipe book there, that I might have to find on Amazon and order. I think I need to expand my horizons with smoothie making... I pretty much stick to the same recipe all the time. I think I'm in a smoothie rut. But it isn't a bad rut to be in. Things could be worse.

One of my favorite things about summer...
This is the sweetest, juiciest watermelon I have had so far this season. Thanks to our neighbors for buying a watermelon that was too big for them to finish- they gave us half of it! I cubed it and will be eating it as snacks and desserts for as long as it lasts. 

Now, I know I said this wasn't going to be a hummingbird blog. I lied. I have to share this picture. If you are sick of seeing hummingbirds on here, stop reading now. But come back tomorrow! This hummingbird madness can't go on forever.
Remember my complaints about bad lighting for my first hummingbird pictures I posted? Here is an example. Good lighting (and the right camera setting) makes all the difference in the world!

Maybe the next blog will be hummingbird free. Don't hold your breath though.

Tuesday, May 3, 2011

Cinco De Mayo Recipe

Nate and I make most of our meals at home- going out to eat is a rare occasion for us. I try to keep our meals interesting by experimenting with new recipes. My goal is always to try at least one new recipe a week (most weeks it ends up being more than that though). This is how I enjoyed drinking my coffee on Saturday morning.
I decide what to make for the week and make a shopping list. It seems like a lot of work, but it actually ends up saving me time because I only have to make one trip to the grocery store each week (usually) and I don't have to take time figuring out what to make for dinner every night. Believe me, when I first started thinking about doing this I thought it was not very realistic for me, since I'm not much of a planner. But now I LOVE it and never skip making a menu plan for the week :) I have discovered SO many new delicious recipes because of this, most likely, recipes I may have never tried if I hadn't planned ahead and searched through my cookbooks. I also throw less food out, because I know exactly what food I need to buy for each week. I only plan dinners and our lunch is always the left overs from the night before.

One of my new favorite recipes that Nate and I tried for the first time last week, will be perfect for Cinco De Mayo. I am looking forward to making it on Thursday.


Grilled Yuca Tortillas
Adapted from Veganomicon

Yuca Filling:
1 pound yuca, peeled, chopped into 4-inch chunks, and each chunk quartered
1 Tablespoon safflower oil
5 cloves garlic
1 red bell pepper, diced
1 fresh jalapeno, minced
2 teaspoons lime juice
1/2 teaspoon salt
pinch white pepper
1/2 cup sauteed corn kernels

Boil 3 quarts of water in a large, lidded pot. Add the yuca and cook for 20-25 minutes, until the yuca is tender and flakes easily when pierced with a fork. Drain and allow to cool. When yuca is cool enough to touch, remove any thick rubbery skin or fibrous core if present. Gently mash with potato masher.

Place the oil and garlic in a large skillet. Cook over medium heat, stirring constantly, for 2 minutes. Add the red pepper and jalapeno pepper, and cook, stirring occasionally, until peppers are very soft, 6-8 minutes. Remove from heat, pour over mashed yuca. Stir in the lime juice, salt, and white pepper, mashing the mixture even more, until everything is combined. Stir in the sauteed corn kernels. 

To assemble: Heat a large skillet over medium heat. Spray pan with oil. Spread a generous 1/2 cup of filling over half the tortilla, fold in half, gently pressing the tortilla together. Place in heated skillet and grill each side until nicely toasted. Remove from heat, cut in thirds, and serve with guacamole and salsa.


Nate made us delicious fresh salsa and I made a super simple guacamole by mashing an avocado and adding a little salt, pepper, and lemon juice.

Fresh Salsa
Adapted from Skinny Bitch

2/3 cup diced cherry tomatoes
1/4 cup diced red pepper
1 minced garlic clove
1/4 teaspoon diced jalapeno pepper
3 teaspoons lime juice
3 tablespoons finely chopped fresh cilantro
salt and pepper to taste

Mix together all the ingredients, cover and refrigerate until ready to use.


The perfect Cinco De Mayo meal... maybe pair it with a Skinny Girl Margarita? I do love Bethenny Frankel... But I haven't tried her drinks or drink recipes yet.

Enjoy!