Saturday, July 30, 2011

DIY Household Cleaners

Call me crazy, but I have decided to make my own household cleaners. Not all household cleaners... yet. Just a few simple go-to cleaners that I will use fairly often. There are several reasons to make your own cleaners- they save money, they are better for the environment, they are not tested on animals (I picture those poor bunnies getting strong chemicals put in their eyes. Seriously, why are they still doing that?) and there are no harsh/toxic chemicals involved that can harm you when you breathe them in. Oh, and they actually work! I am sure there are more reasons, but those are the reasons that pushed me to make my own. These are the three cleaners I made today.
The ideas I used today all came from here and here. There are other cleaning product recipes on those websites too, that I may try in the future. Look who came right over and posed when I was photographing these cleaners. I guess she is used to being the center of attention in my pictures.
Here are all the ingredients you need to make these and several other cleaners for your home.
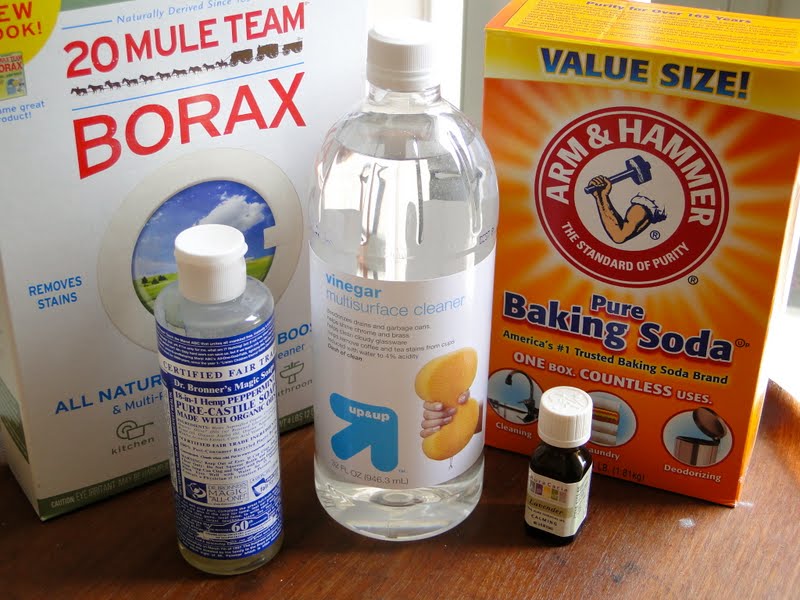
UPDATE: Arm and Hammer tests on animals! If you are going to make these recipes, see if you can find an alternative baking soda brand!
Borax was the only thing I had never used before- you can find it in the laundry section. It has TONS of cleaning uses listed right on the box. The baking soda and vinegar were also in the laundry aisle. I got my pure-castile soap at Trader Joe's and my lavender essential oil at EarthFare- most health food stores should have both of those products. You can choose any essential oil you like the smell of. I love the scent of lavender and it is supposed to have a calming effect when you breathe it in. It is also a natural antibacterial oil. Who wouldn't want that? Tea tree oil is another great option- it cleanses and disinfects. My house currently smells of lavender right now and I am loving it.

Really the only other things you will need are measuring cups, measuring spoons, spray bottles, and a funnel.
The first thing I made was the antibacterial spray. This is the easiest thing ever.

Mix 1 cup of water with 20 drops of lavender essential oil. Put in a spray bottle. That's it! Lavender is very high in linalool which is naturally an antibacterial. I sprayed this on my couch instead of Febreeze (which I recently found out, tests on animals). I am also washing our sheets today so I sprayed in on the mattress. Maybe it will make me feel more calm when it is time for bed :)

The next thing I made was the all-purpose cleaner. I mixed 1 teaspoon of baking soda, 1/2 teaspoon pure-castille soap, 2 tablespoons vinegar, and 1 and 1/2 cups of water. I used it to clean my counters and computer desk. It worked perfectly. The pure-castiile soap gives it a nice peppermint scent. You could also add a few drops of your favorite essential oil.

Lastly, I made the scouring powder. I mixed 1/2 cup salt, 1/2 cup Borax, and 1/2 cup baking soda. I used it to clean the sink and it came out just as shiny as when I have used any other product. I made a small recipe because I was almost out of salt- double the recipe if you want to make more at once.

And that's all there is to it! If you are interested in finding out what products do and don't test on animals, there is a list here. If you don't know much about animal testing, try googling it. I have read several articles that I should have bookmarked so I could share them. One short article to start with can be found here- this article mentions the Draize Eye Test- that was enough for me to realize that this is something I DO NOT want to support. I just think it is completely unnecessary to torture animals for things such as cosmetics and cleaning agents- there are so many companies that don't do this and I would much rather support them. I only recently actively started seeking out non-animal tested products (Don't worry, there are tons out there!) I used to not buy products if I somehow happened to know they tested on animals, but I didn't actively look into it. One of the many reasons I love trader Joe's- their little section of cosmetics/cleaning agents are all certified cruelty free! No animal testing at Tj's (no GMO ingredients in their food items either... thats for another blog though).

I'll step off my soapbox now... I am certain that so many people are not aware that this is even going on, so I wanted to let my small little blogger world know... it might strike a cord with a few of you. If not, I tried :) I promise I will keep posting yummy recipes for you to come back for.

On that note: Look what I get to use for a month!!
A Vitamix!! If you haven't heard about these, they are amazing (from what I have read). This is a SUPER POWERFUL machine that can make everything. Pretty much. Nate has a friend from work who has TWO in her home right now because her son is home from college. SO she was nice enough to let us borrow one! The first and only thing I have made so far is mint chocolate chip ice cream (made from almond milk).
I am also looking forward to juicing with it. If anyone has a favorite Vitamix recipe they would like to share, I'd love it! I look forward to all the yummy things I will make. Then I am sure I will dearly miss it at the end of August.
I look forward to sharing any recipes that I discover!

Update: Right after I posted this blog, I went to the grand opening of Eco-licous. If you are in the Charlotte area I would HIGHLY recommend this store! It has cruelty-free and eco-friendly products for you and your home. This article describes it better than I ever could. I wanted to buy one of everything!

Thursday, July 28, 2011

Quinoa Pasta with Creamy Avocado Arugula Sauce

Tonight I made this wonderful pasta dish, inspired by my favorite chef ever, Giada De Laurentiis.
For several years (probably ever since I started watching Food Network) Giada has been my idol. When I watch Giada at Home, I often jokingly say to Nate... or Lilly, "I wish I could be Giada" (ok, maybe only half jokingly). I used to say the same thing when watching Everyday Italian and Giada's Weekend Getaways. Who wouldn't want to be an amazing Italian chef who lives in a beach house in Santa Monica, has a husband who is a fashion designer for Anthropologie (be still my heart), and an adorable daughter who eats everything you make? I have bought (and saved) every magazine I have seen with her on the cover. I DVR her show weekly, and I have some of her cookbooks (certainly not all though). I watch her show all the way through, even if the episode doesn't contain a single recipe I would ever make. Maybe I have a slight obsession? I love the little clips on the show of her family and friends living the good life on the beach in California. She has my dream backyard. And kitchen. And dinnerware. All perfect for food photographing.
[Source]
If you have watched any of her shows or made any of her recipes, you might have noticed that basically every single one has cheese integrated into it somehow. She is Italian after all. This dish is scrumptious even without the cheese- there were plenty of other flavors to liven it up! I also made it gluten free by using this delicious quinoa pasta. I would highly recommend it!
This is what it looked like before I mixed the avocado cream sauce all together with it.
Quinoa Pasta with Creamy Avocado Arugula Sauce
(Print Recipe)
Adapted from Giada De Laurentiis

Ingredients
8 ounces quinoa veggie curls pasta (or 8 ounces of your choice pasta)
1 medium avocado, halved, peeled, and seeded
1 1/2 cups baby arugula leaves
1/2 packed cup fresh basil leaves
2 tablespoons fresh lime juice (from 1 lime)
1 clove garlic, peeled and smashed
1/2 teaspoon kosher salt
1/2 teaspoon freshly ground black pepper
1 medium tomato, diced
1/2 cup sliced almonds, toasted (optional)

Directions
Bring a large pot of salted water to a boil over high heat. Add the pasta and cook until tender but still firm to the bite, stirring occasionally, 6 to 8 minutes. Drain and reserve about 1 cup of the pasta water. Place in a serving bowl.

Using a spoon, scoop out the flesh from the avocado and place in a food processor. Add the arugula, basil, lime juice, garlic, salt, and pepper. Blend until smooth.

Pour the pesto over the pasta and toss together. Add the tomatoes and almonds and toss together until coated, adding the pasta water, as needed, to loosen the sauce.
Giada always saves her pasta water to use incase the sauce needs to be thinned out a little. I love this trick and do it all the time myself too. The starchy water is a better addition to a sauce, than straight tap water. This was one of the fastest dinners to make, ever. It literally took no longer than the time for the pasta to cook. The sauce was whipped up in the food processor while the pasta cooked.

I love how how healthy, simple, and delicious this meal is. I have submitted it to summer wellness weekends.
Thanks Giada! I bet you never would have guessed you are such an inspiration to a vegan blogger! 
Maybe she needs a vegan assistant?

Monday, July 25, 2011

Granola Bars

We finally had a small break from the heat! It rained a little, late this afternoon and cooled it down enough for me to venture outside with my camera for a little bit. It was great timing, because tonight I made these.
I experimented with this recipe last week and was disappointed with how crumbly they turned out, but the taste was great. I tweaked it a little this time and it came out much better- I could actually cut them into bars this time! Here are all the ingredients I used.
I mixed them together, and pressed them into a pan. Note: Do NOT follow my example of using wax paper- parchment paper works much better, but I was out! The wax paper stuck to the bottom of the bars and I had to carefully peel it off piece by piece.
Then cut them into delicious bars.
Here's the recipe, so you can do it too!

Granola Bars
(Print Recipe)
Adapted from Ina Garten

Ingredients
2 cups oats
1/2 cup shredded coconut, unsweetened
1/2 cup sliced almonds
1/2 cup pepita seeds
1 1/2 cups dried fruit, well chopped (I used mango and cranberries)
3/4 cup rice krispie cereal
1/4 cup flax meal
1 tsp vanilla extract
1/2 tsp almond extract (optional)
1/4 tsp sea salt
1/3 cup maple/agave blend (or just pure agave or pure maple syrup)
1/3 cup almond butter

Directions
Preheat the oven to 350 degrees F.
Toss the oatmeal, almonds, pepita seeds, and coconut together on a sheet pan and bake for 10 to 12 minutes, stirring occasionally, until lightly browned. Transfer the mixture to a large mixing bowl and stir in the flax meal and cereal.
Reduce the oven temperature to 300 degrees F.
Place the almond butter, maple/agave blend, almond extract, vanilla, and salt in a small saucepan and bring to a boil over medium heat. Cook and stir for a minute, then pour over the toasted oatmeal mixture. Add the chopped dried fruit and stir well.
Pour the mixture into a parchment lined 8x12 baking pan. Wet your fingers and lightly press the mixture evenly into the pan. Press the mixture well! Bake for 25 to 30 minutes, until light golden brown. Cool for at least 2 to 3 hours before cutting into squares or bars. Serve at room temperature.
Hints: 
1. Make sure your dried fruit is chopped well to help everything stick together. I put mine in the food processor to make it easier on myself. 
2. Also make sure you stir the wet mixture very well with the dry mixture before pouring into the pan. Use your hands if you find that works better (I did). 
3. Make sure you use slightly wet hands to press this mixture into the pan and pack as tightly as possible.
4. Most important hint- Let cool completely before cutting. I put mine in the fridge for 30 minutes and then the freezer for 30 minutes, so I didn't have to wait 3 hours for them to cool. I am too impatient to wait that long!
I cut mine into 12 large bars. I think I may cut them in half to make smaller squares.

I'm not sure how many recipes I will have to share this week. As I have stated before, I am a menu planner. Lately I have been trying several new recipes every week- usually 4 or 5! This week, for some reason, menu planning was a struggle... I was not inspired to try many new things. I ended up deciding to make mostly tried and true recipes. Here is my attempt at organization (I have been doing this since I started the whole menu planning thing). 
I always post upcoming appointments here, along with our menu, and a running shopping list of pantry staples that we run out of. As you can see from our menu, most of our meals are recipes I have shared on here before. I may have to find something else to blog about this week! Don't let this fool you, as I said, this is a small attempt on organization... I am not nearly as organized as I would like to be! Actually, there are still granola crumbs on the counter right now as I type this, I am not good at cleaning up messes right away either- Nate can attest to that. I have better things to do! Like blog about the mess I just created. And Pinterest pretty pictures of organization, photography, and well-lit spotless kitchens. A girl can dream, right? 

Besides granola bars, this is what I have been snacking on lately. I know you are surprised to see pictures of fruit on this blog. I never take pictures of fruit.
They were $1.99 a pound! I couldn't resist.
Check out the condensation. Even though there was a slight cool down, there is always the lovely humidity here.
I'm going to go clean up those granola bar crumbs now. Really, I am. I will not be on Pinterest first.

Friday, July 22, 2011

Barley Taco Salad

I cannot believe how hot it has been this week (I know, I know, I am not the only one). It has been a struggle for me to cook and even more of a struggle for me to photograph what I have cooked, in the sweltering heat outside (but there is oh such wonderful lighting)! My camera lens immediately fogs up when I take it from the house to the backyard. Not to mention the fact that I feel sweat forming on my forehead within 30 seconds of being out there... And I can't breathe... The air is so thick and humid... And Lilly barks because she wants me to open the door so she can join me (and sniff the food I am taking pictures of). Then she barks less than a minute later to go back inside. Because it is too hot. This scenario has been repeated several times. True story.

So, if you are wondering why I haven't posted as often as usual this week, read the above paragraph, again. I did take a few quick pictures of today's dinner, which was super yummy! It is a good filling salad for the summer. You will have to use your stovetop for a little bit, but at least not your oven.
Barley Taco Salad
(Print Recipe)

Ingredients
1 cup barley (optional: soak overnight)
1 cup sliced cherry tomatoes
1 green pepper, chopped
2 ears corn, cooked and kernels removed
1 avocado, cubed (drizzled with lemon juice)
1 can black beans, drained and rinsed
Juice from one lime
1/4 cup cilantro
1/2 cup fresh salsa
Salt and pepper to taste
Optional: red pepper flakes
Romaine Lettuce, chopped

Directions
Cook the barley with 2 and 1/2 cups water until all water is absorbed (about 30 minutes). Add all the ingredients to a large bowl. Stir well, add salt and pepper to taste, sprinkle on some red pepper flakes for extra spiciness. Serve over a bed of chopped romaine.
So delicious on a 100 degree summer day! I love all the colors in there too.
I hope everyone else is finding a way to stay cool! I am grateful we have air conditioning- I know my family, friends, and fellow bloggers who are in the New England area might not have that luxury since it is needed so scarcely. Oh, but you do have rivers nearby to cool off in! I wish we had something like that close to Charlotte.

Happy salad making.

Wednesday, July 20, 2011

Stuffed Peppers

Before today, I was not a stuffed pepper fan. I have not had them in a very long time and I am guessing the ones I had tasted in the past were very substandard. I came across a recipe the other day that had me intrigued, so I decided it was worth a shot! I have to say, I am so glad I decided to try it.
Yummy looking, right? After I took these pictures I decided to add avocado, fresh basil, and a few slices of fresh cherry tomatoes as garnish (I wished I had thought about this before my food photo shoot!) If you make these, I would highly recommend adding all 3 things (especially the avocado and basil) for an extra pop of fresh flavors!
Stuffed Peppers
(Print Recipe)
Adapted from FatFree Vegan

Ingredients
1 medium onion, chopped fine
1 large portabello mushroom, diced
1 jalapeño pepper, minced (or more to taste)
1 16-ounce can black beans, drained and rinsed well
1 1/2 cups fresh corn (from 2 corn cobs)
1 15-ounce can can fire-roasted tomatoes
1 medium fresh tomato, diced
1 teaspoon smoked paprika
1 1/2 teaspoon chili powder (or more, to taste)
1 teaspoon salt
1/2 cup dry basmati rice, cooked according to package direction
5 red, orange, or yellow bell peppers
1 avocado, diced
fresh basil and sliced fresh cherry tomatoes for garnish

Instructions
Heat a large non-stick skillet or saucepan. Add the onion and cook, stirring often until it softens, about 4 minutes. (Add a splash of water as necessary to prevent sticking.) Add the mushrooms and jalapeno and continue to cook until mushrooms soften.
Add black beans, corn, tomatoes (canned and fresh), rice, and seasonings. Cook for a few more minutes to allow most of the tomato liquid to cook off.
Preheat oven to 400F.
While the chili is cooking, prepare the peppers by cutting them in half through the stem end, removing the seeds and membranes, and rinsing the insides to make sure all the seeds are out. Check to see if they will stand upright, and if not, peel a strip off of the back side. Oil a baking dish big enough for the peppers (or line it with parchment paper). Fill each pepper half with the chili and place it in the baking dish. Bake until peppers are tender, about 25 minutes.
Sprinkle each pepper with avocado, fresh basil, a few slices of cherry tomatoes and serve hot.
Oh so tasty! If you are not a mushroom fan, I truly think you will still like these- you can't even tell they are in there, but they add some nutrients and bulk to the dish!

I just had to share this photo collage from a dog birthday party we attended last night. Such cute pups! Can you tell which one is the birthday girl? (Hint: She's dressed for the occasion).
It was super hot out, but the dogs had plenty of water to dink and some doggie daiquiris (non alcoholic, of course). Look at these YUMMY doughnuts the birthday girl's mom made (recipe here)- These were treats for people, not dogs.
Who doesn't love a good puppy party, with homemade doughnuts?

Nate and I still have more and more tomatoes ready in our garden every day- I used some of them for the stuffed peppers but still need to use up more! I noticed this today when I went out to the garden... at one point it was a pot of soil. This weed decided to take over, but I think it is kinda pretty.
Even if you don't think you are a stuffed pepper fan, these deserve a chance! They will definitely be going into my menu rotation- especially while all these fresh veggies are in season. I am guessing they could be done on the grill too (medium heat, on foil, cover closed)- which would be a great way to keep your kitchen cool in this summer heat!
Happy cooking!

Sunday, July 17, 2011

Six-Shades-of-Red Soup

The making of this soup recipe couldn't have come at a better time. I had planned on making it because I happened to have all the ingredients in my pantry & fridge and some of them had to be used up soon, before they went bad. The day I had planned it for actually ended up being cloudy, dreary, and unseasonably cool- perfect for soup! Not to worry though, our summer heat is already coming back today and it will continue to get hotter every day throughout the week!
I can't take any credit for this recipe what-so-ever. I got it from Color Me Vegan and made very minimal adjustments. It is great just as it is! I did use some purple potatoes and I added a parsnip because I had it, I'm sure other veggie additions would be good too. I also changed the onion cooking instructions (the original recipe called for boiling it, but I am so used to sauteing onions for a soup base, that that's what I ended up doing)

Six-Shades-of-Red Soup
(Print Recipe)
Slightly adapted, from Color Me Vegan

Ingredients
1 red onion, diced
1 tablespoon oil
2 cloves garlic
10 cups water
2 cups red lentils
3 red (or purple) potatoes, unpeeled and chopped
2 red beets, peeled and diced
2 carrots, finely chopped
1 parsnip, finely chopped (optional)
1/2 teaspoon crushed red pepper flakes
1 tablespoon finely chopped dill
1/4 to 1/2 cup red miso paste, depending on how strong it is (I used 1/4 cup)
1/2 cup vegetable juice (I used vegetable broth)
1 teaspoon salt
pepper, to taste

Directions
In a large soup pot saute the onions in the oil, over medium heat, until opaque (5-7 minutes). Add the garlic and saute one more minute. Add the water, lentils, potatoes, beets, carrots, parsnip, red pepper flakes, and dill. Cover, raise heat to high and bring to a boil. Then reduce heat and simmer for 20-25 minutes, until potatoes are fork tender.
In a small bowl thoroughly combine the miso and juice. When the soup is done, remove from heat and stir in the miso mixture. Serve and garnish with dill.

Note: Do not skip using the miso- I taste tested the soup before the miso addition and it was much better after the miso was added.

Turn this
into this (with a few more ingredients)
I also recently made Larabars. There are recipes all over the internet for these 5 ingredient (or less) bars. I put this blueberry bliss recipe on a printable page, so that I can print it off and put it in my recipe binder (nerdy... I know, I know). I thought I'd share it with you incase you wanted to do the same thing (probably not, but maybe). It was so simple to make. I found the measurements here, and doubled it. There are also a bunch of other flavor combinations on the same page! If you are interested in peanut butter and jelly bars, there is recipe here. There is also a yummy looking cherry Larabar recipe here.

These are the 5 ingredients I used to make this yummy bar.
Almonds, Dried blueberries (I couldn't find any with no added sugar! Does anyone know where I could?), medjool dates, lemon zest, and almond extract.

Blueberry Bliss Bars
(Print Recipe)

Ingredients
1/2 cup dried blueberries
1/2 cup roughly chopped medjool dates
2/3 cup almonds
1/2 teaspoon lemon zest
a few drops of almond extract (I think they would still be yummy without this, if you don't have it)

Directions
Put the blueberries, dates, lemon zest, and almond extract in a food processor and process until it becomes like a paste. Transfer to a medium bowl. Put the almonds in the food processor and process until finely chopped. Add to the date mixture. Use your fingers to knead the date mixture and almonds together. Roll out into a rectangle and cut into 4 or 5 bars. Wrap in plastic wrap and store in fridge.

Easy!!
And no added... anything that's bad for you!
Nate and I have been excited about our tomatoes ripening in the garden. Soon we will have a plethora of fresh tomatoes. I went outside today and first saw this.
Then, much to my surprise, saw this!!
A green horned caterpillar!
They eat tomato plants! He blends in quite well with the plant, in fact, I almost touched him before I realized he was there. Neither Nate or I wanted to kill him, so he is now far down a hill, past our fence.
I read that they can be over three inches long. I think this one was pretty close!
I hope there aren't more where he came from. We will have to keep our eyes out for them! I need to start figuring out what I am going to do with all our tomatoes, because they are all going to be ripe at the same time, I just know it. Marinara sauce, tomato soup, lots of salads. Does anyone have any other ideas?

Saturday, July 16, 2011

God's Candy

It's summer and I can't get enough of this stuff!
I love how fresh in-season produce tastes... this winter is going to be rough.
These strawberries are sooo sweet.
Plus, fruit is just so darn pretty.
Loving the contrast here.
Juicy...
berries.
Oh summer, please don't fade away...
I will miss you so.